Floor plans are a natural aspect of your architectural workflows. So, too, are reflected ceiling plans (RCPs), which highlight unique architectural features and significantly impact your design's success.
RCPs are an essential form of documentation that creates a comprehensive view of your ceiling design, detailing important elements like lighting fixtures, building systems, and other finishes.
Continue reading to learn the value of RCPs and how to create them with Vectorworks Architect.
What’s a Reflected Ceiling Plan?
An RCP is a unique view of your room or building’s ceiling design. In a sense, it’s very similar to a floor plan, just focused upwards.
Importance of Reflected Ceiling Plans
RCPs serve critical purposes for creating clear project documentation used for collaborating with your team during the design process and for contractors to build exactly what you and your clients want.
Reflected ceiling plans lay out the lighting fixtures in a room, specifying fixture locations and types of lights used, how they connect through various switching systems, and the types of switches involved, such as dimmers or three-way switches. In addition to lighting, RCPs help you coordinate building systems like HVAC ductwork, fans, AV equipment, sprinklers, and smoke detectors, ensuring these elements are correctly integrated into your ceiling design.
RCPs also help you detail the design and finishes of your ceiling, including height, materials, and window treatments.

How to Model and Effectively Create Reflected Ceiling Plans
Vectorworks Architect provides you with all the tools you need to create detailed and aesthetically pleasing RCPs.
Start by modeling your building using standard tools like walls, windows, doors, and slabs.
Ceilings
Use the Slab tool to define ceiling elements within RCP. These tools allow you to create and manage your design's ceiling components with precision.
Ceilings can be incorporated within defined slab styles by including a ceiling component along with other slab assembly components. This method reduces the number of slabs you need to manage and simplifies the project overall.
An alternative approach is to create ceilings as independent slabs (gypsum ceilings, wood slat ceilings, and more, for example) or multi-component ones showing a full assembly system and finish materials set to a specific height. Putting these ceiling slabs on their own design layer will aid in keeping your model organized.
This approach is considered more flexible as it allows for different ceiling make-ups across different rooms and allows for a more comprehensive transfer of geometry when collaborating with external project partners, for example, via IFC file exchange format.
The Ceiling Grid tool is also useful for inserting ceiling grid objects, where you can specify the length, width, and placement angle of the tiles to match your design requirements.
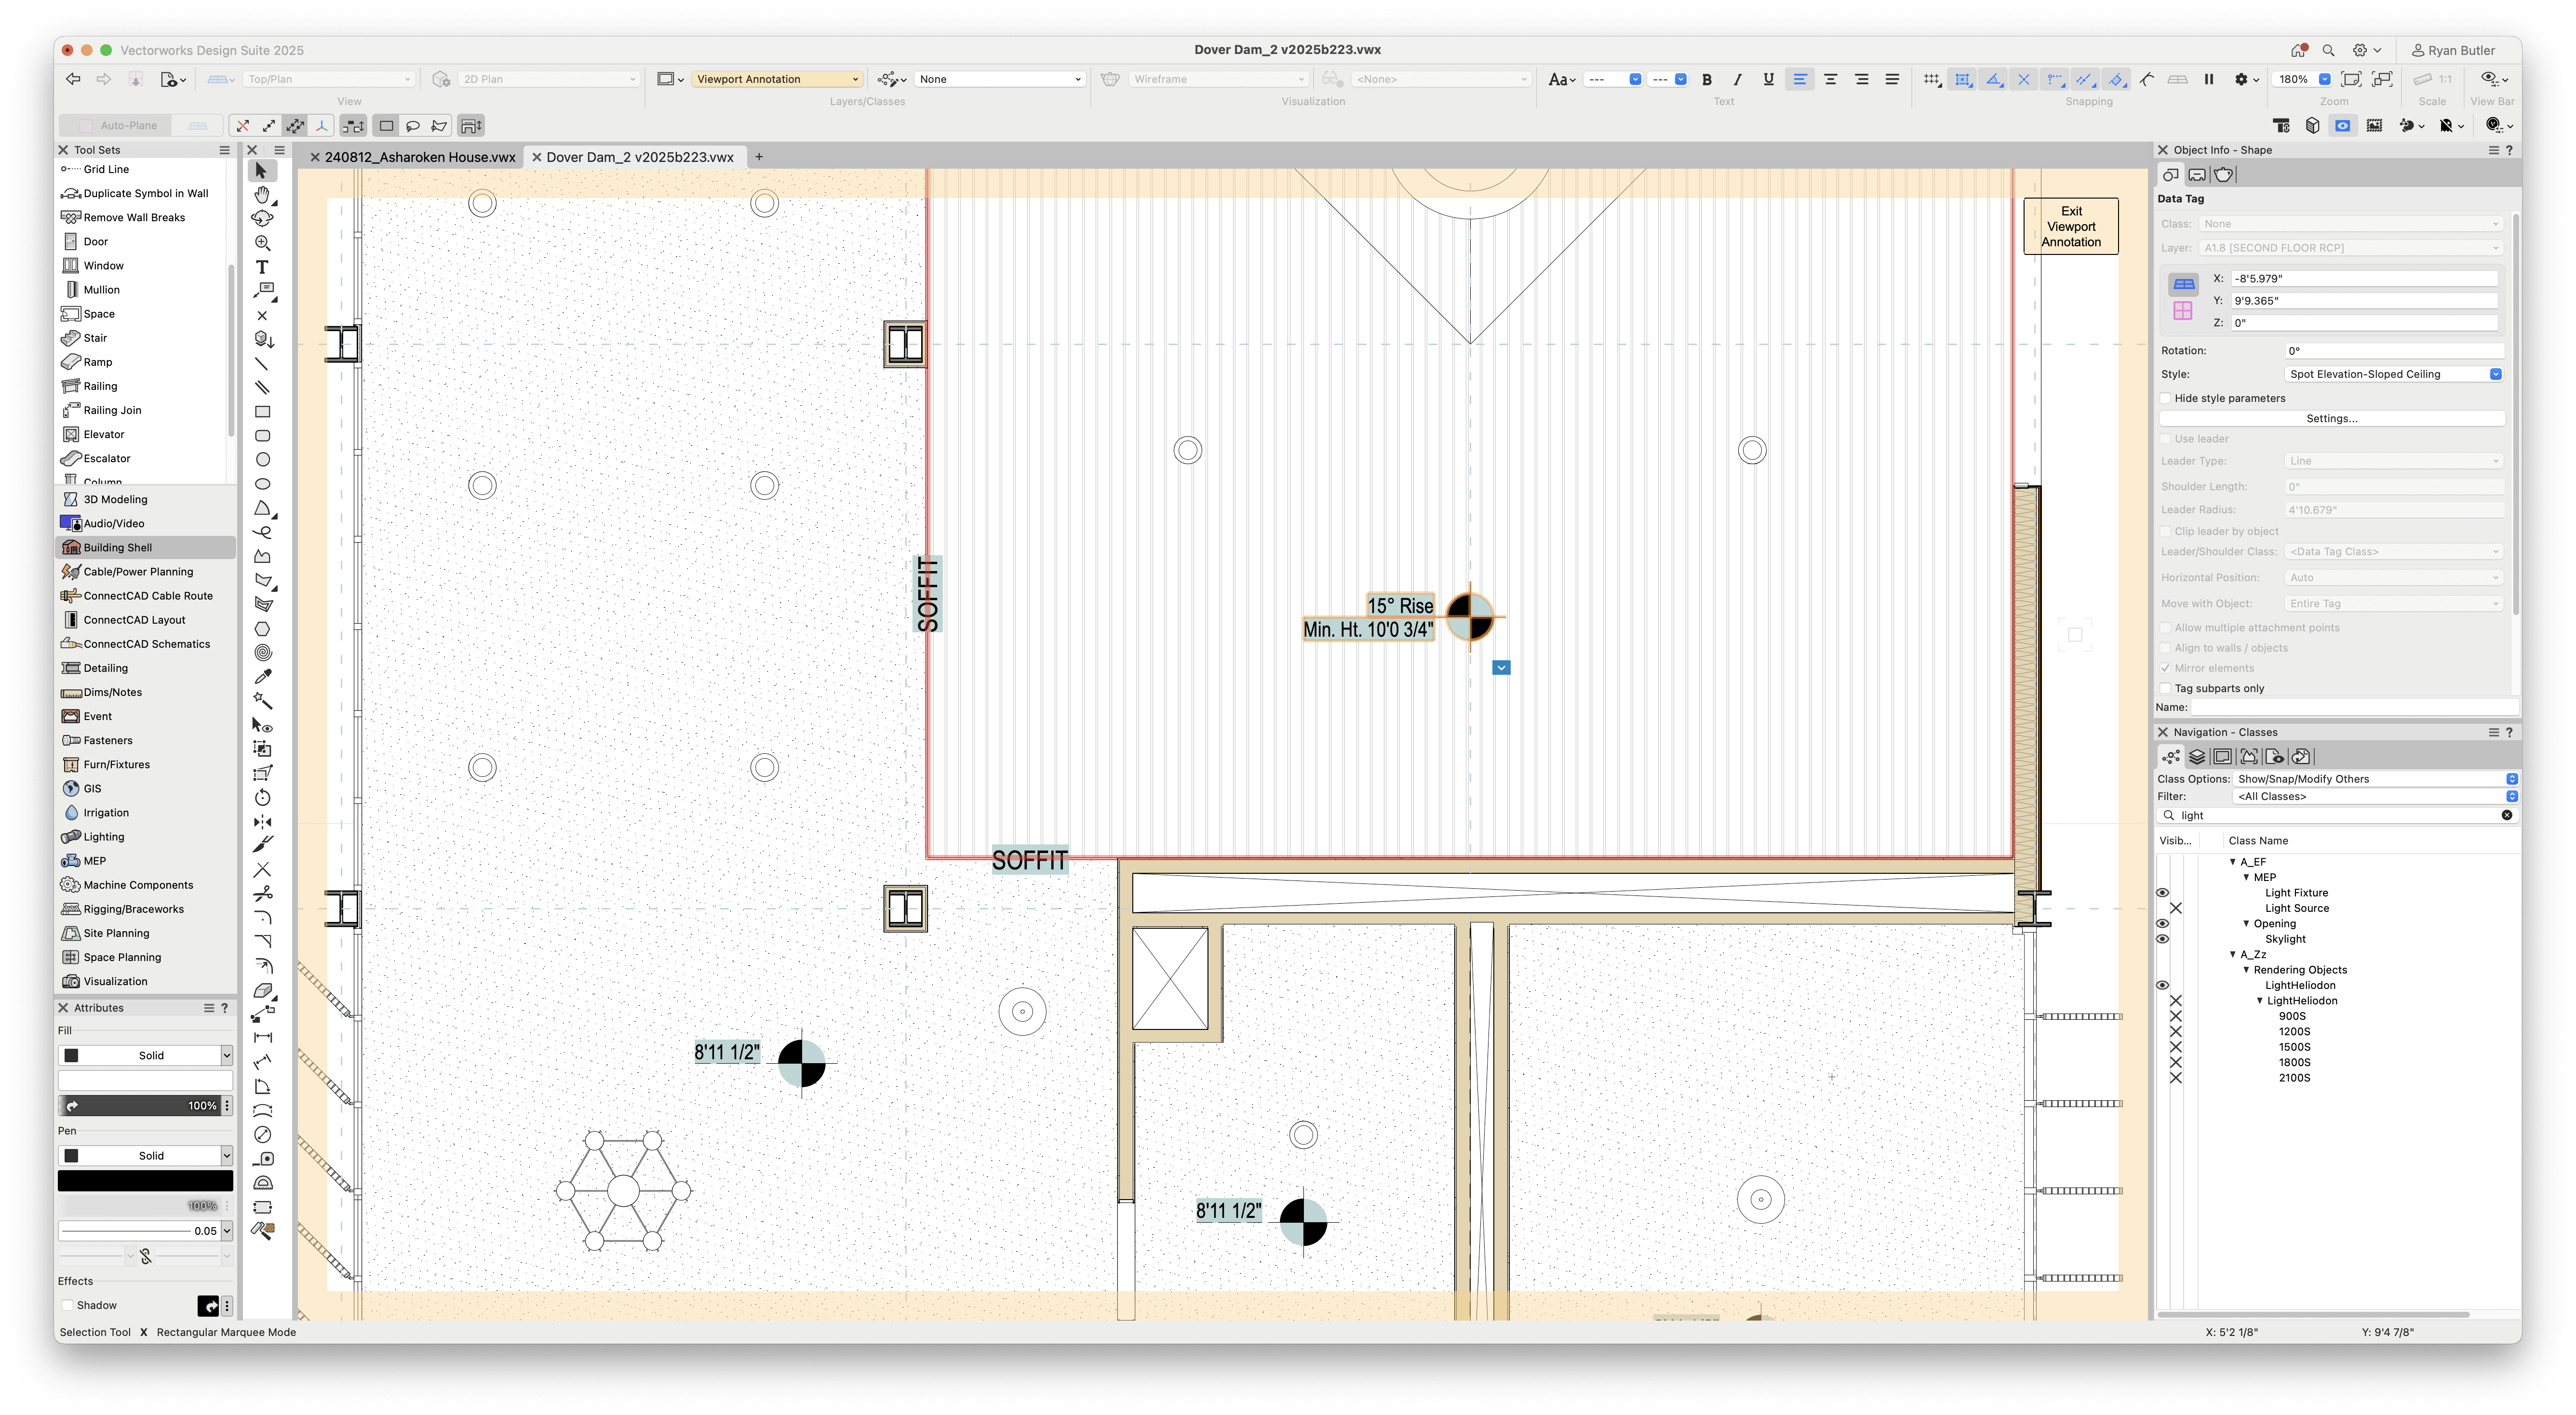
Lastly, to ensure clarity and consistency throughout the plan, use data tags. These automatically get any data attached to objects in the model; for example, in RCP, you need to get the ceiling height from the height of a slab or ceiling grid you modeled before. Remember that data tags can be added directly on the ceiling layer or in the Annotation space of your viewports.
Custom Ceilings for Every Style
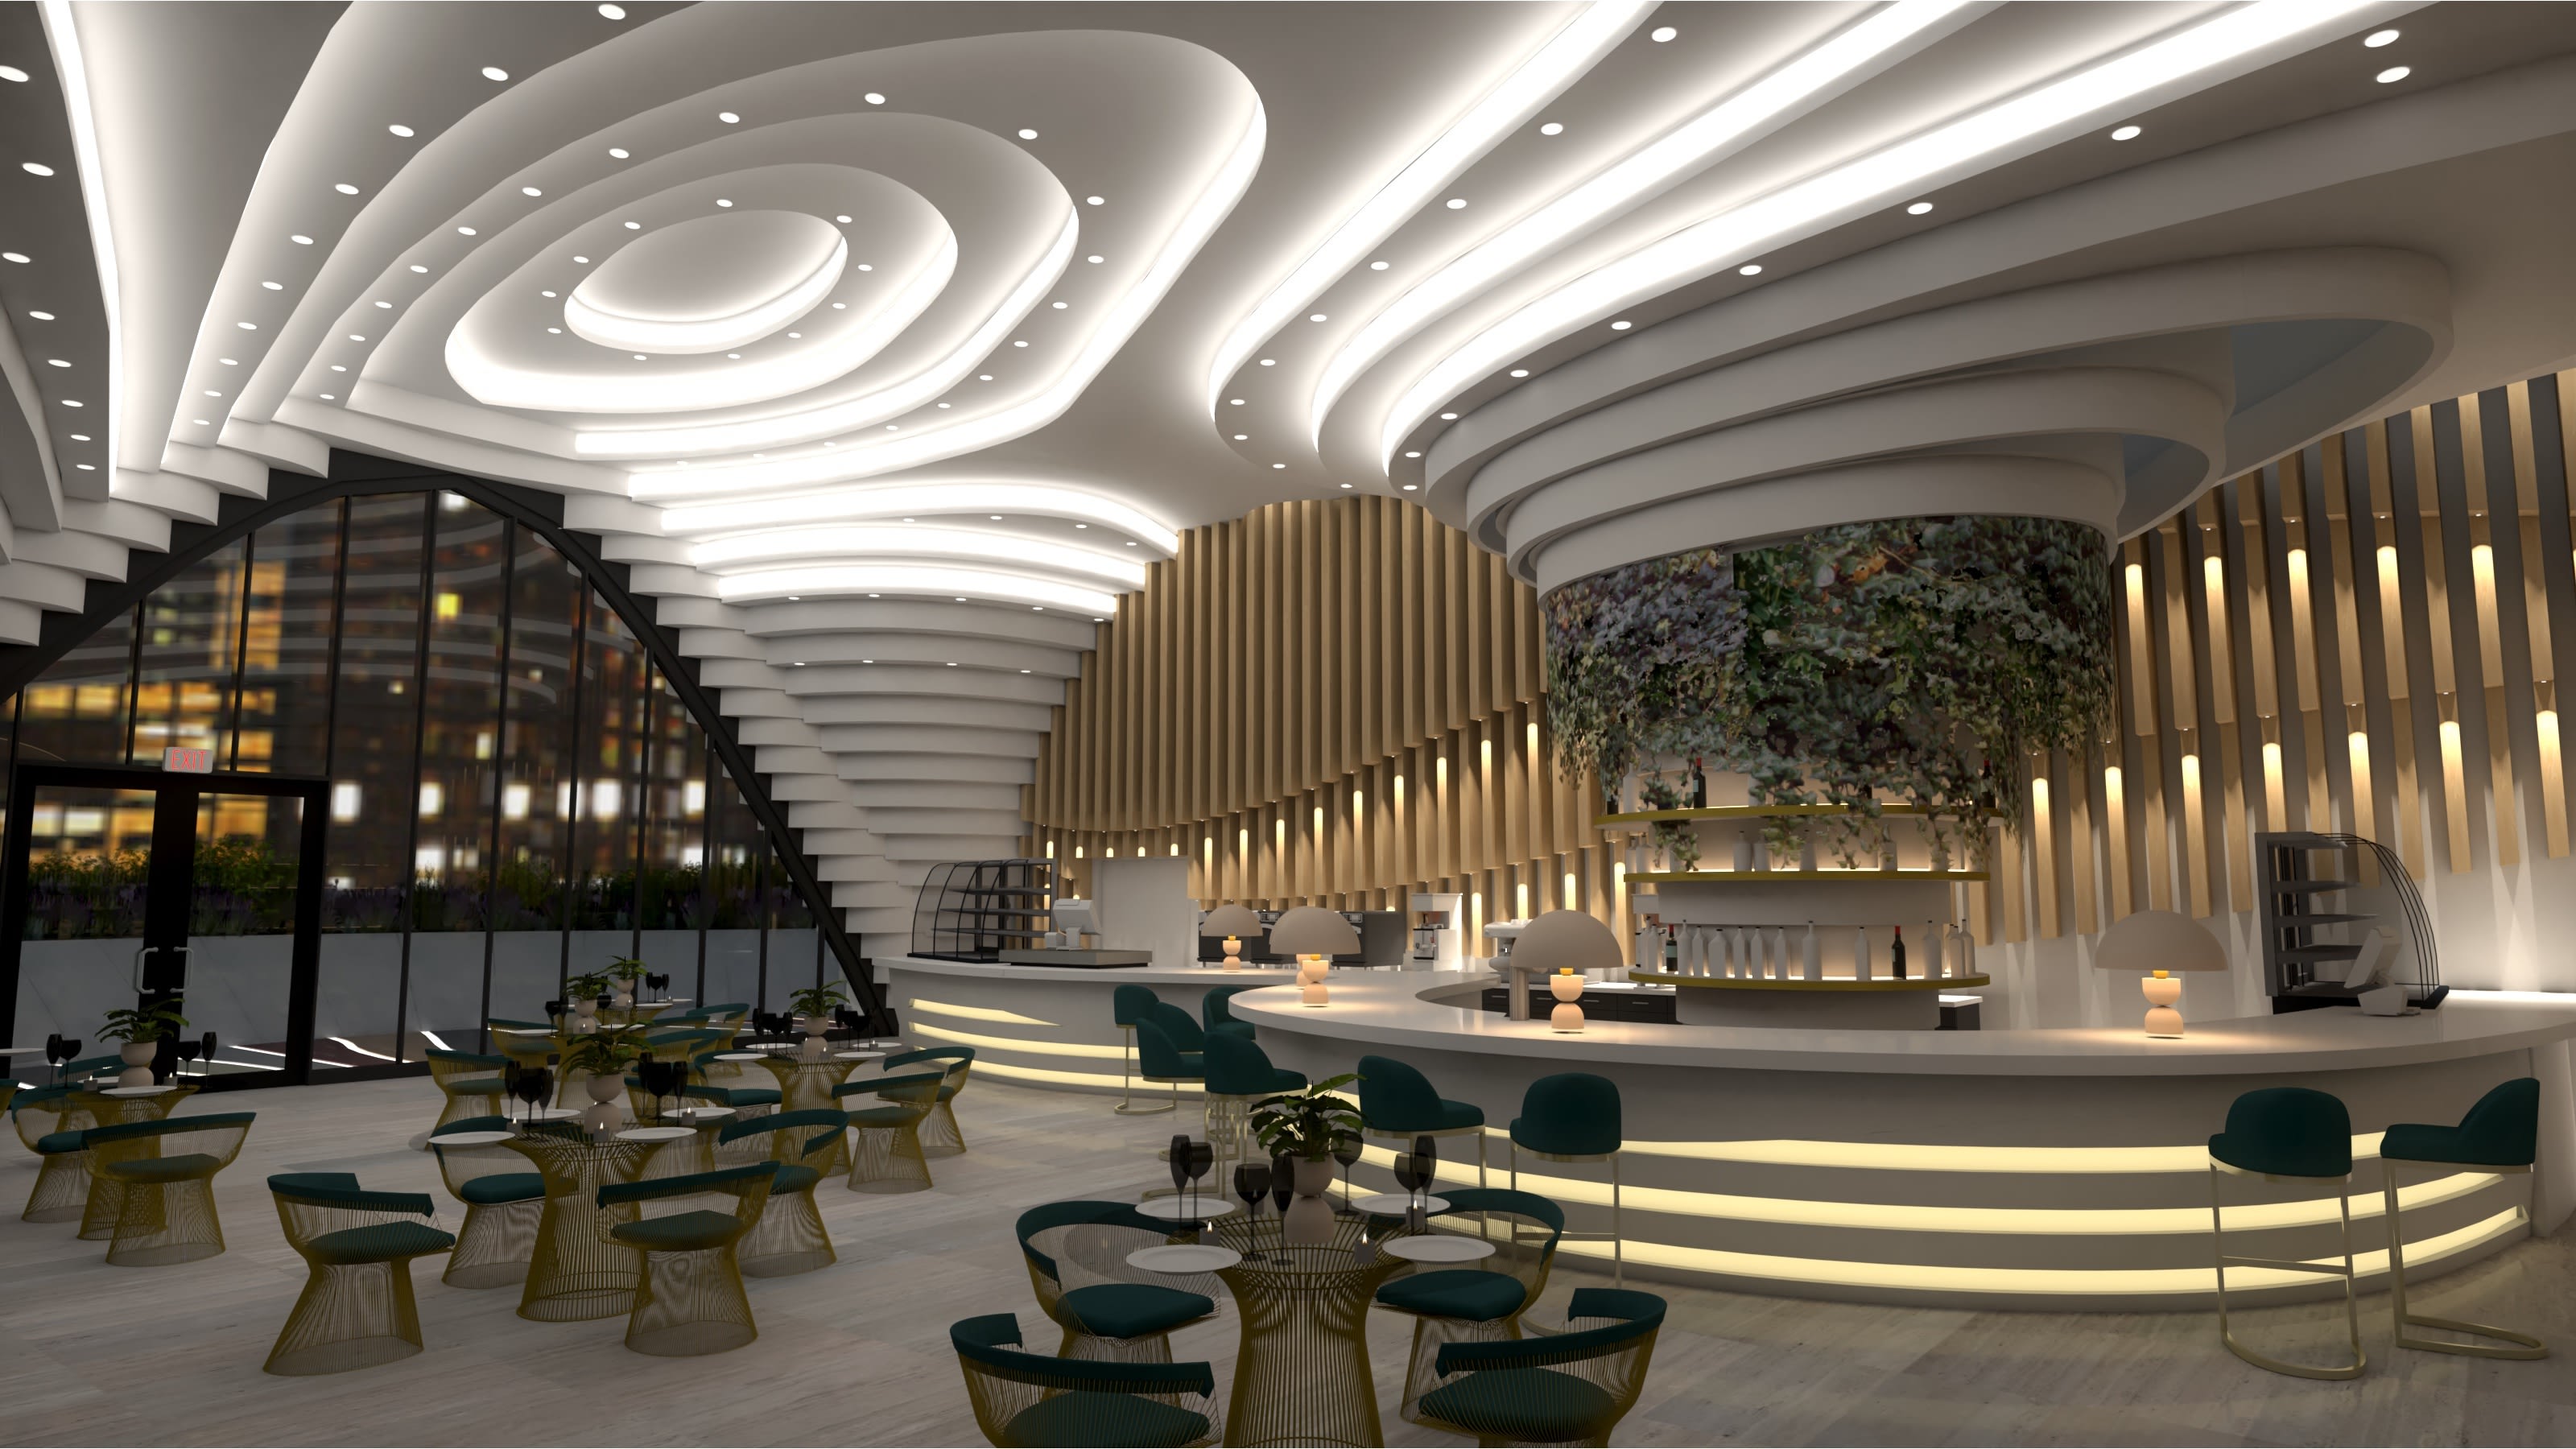
There are so many options when designing ceilings with Vectorworks. While features like Slabs and the Ceiling Grid tool are helpful in most cases, you also need options to create unique ceiling types. Ceilings often incorporate design elements such as coffered, vaulted, curvilinear, non-planar suspended elements, and open grid clouds.
To achieve that level of customization, you can use any of the free-form 3D modeling tools found in Vectorworks. You can also use solid modeling commands to Extrude, Push/Pull, Taper, and Deform objects to your exact needs. For example, you can use the Extrude Along Path command to add moldings for a more traditional-looking ceiling or NURBS surface and subdivision tools for more organic suspended objects.
Light Fixtures
Lighting fixtures are essential when RCPs, and Vectorworks Architect provides robust tools to manage them. You can integrate 3D models of fixtures directly into your design, offering a realistic representation that aligns with the rest of the model.
Hybrid Symbols are useful for any repetitive ceiling objects like fixtures, helping you make changes quickly and easily.
Adding Light objects to your light fixture symbols helps you apply exact settings to your fixtures and better control the quality of your renderings. The Resource Manager also gives you access to a myriad of premade lighting fixtures to use in your design. To learn more about the tool, click here.
Fixture symbols can be surface-mounted or recessed using the Clip tool to modify ceiling objects like Slab objects.
Adding Other Elements to Your Model
For connecting fixtures, Switch Lines and Bridging can be used to illustrate how lighting systems are wired with switch symbols placed accordingly.
Switch lines can be drawn as polylines, and switches can be placed at the desired height, displayed in 3D with text indicating types like 3-way or dimmer switches.
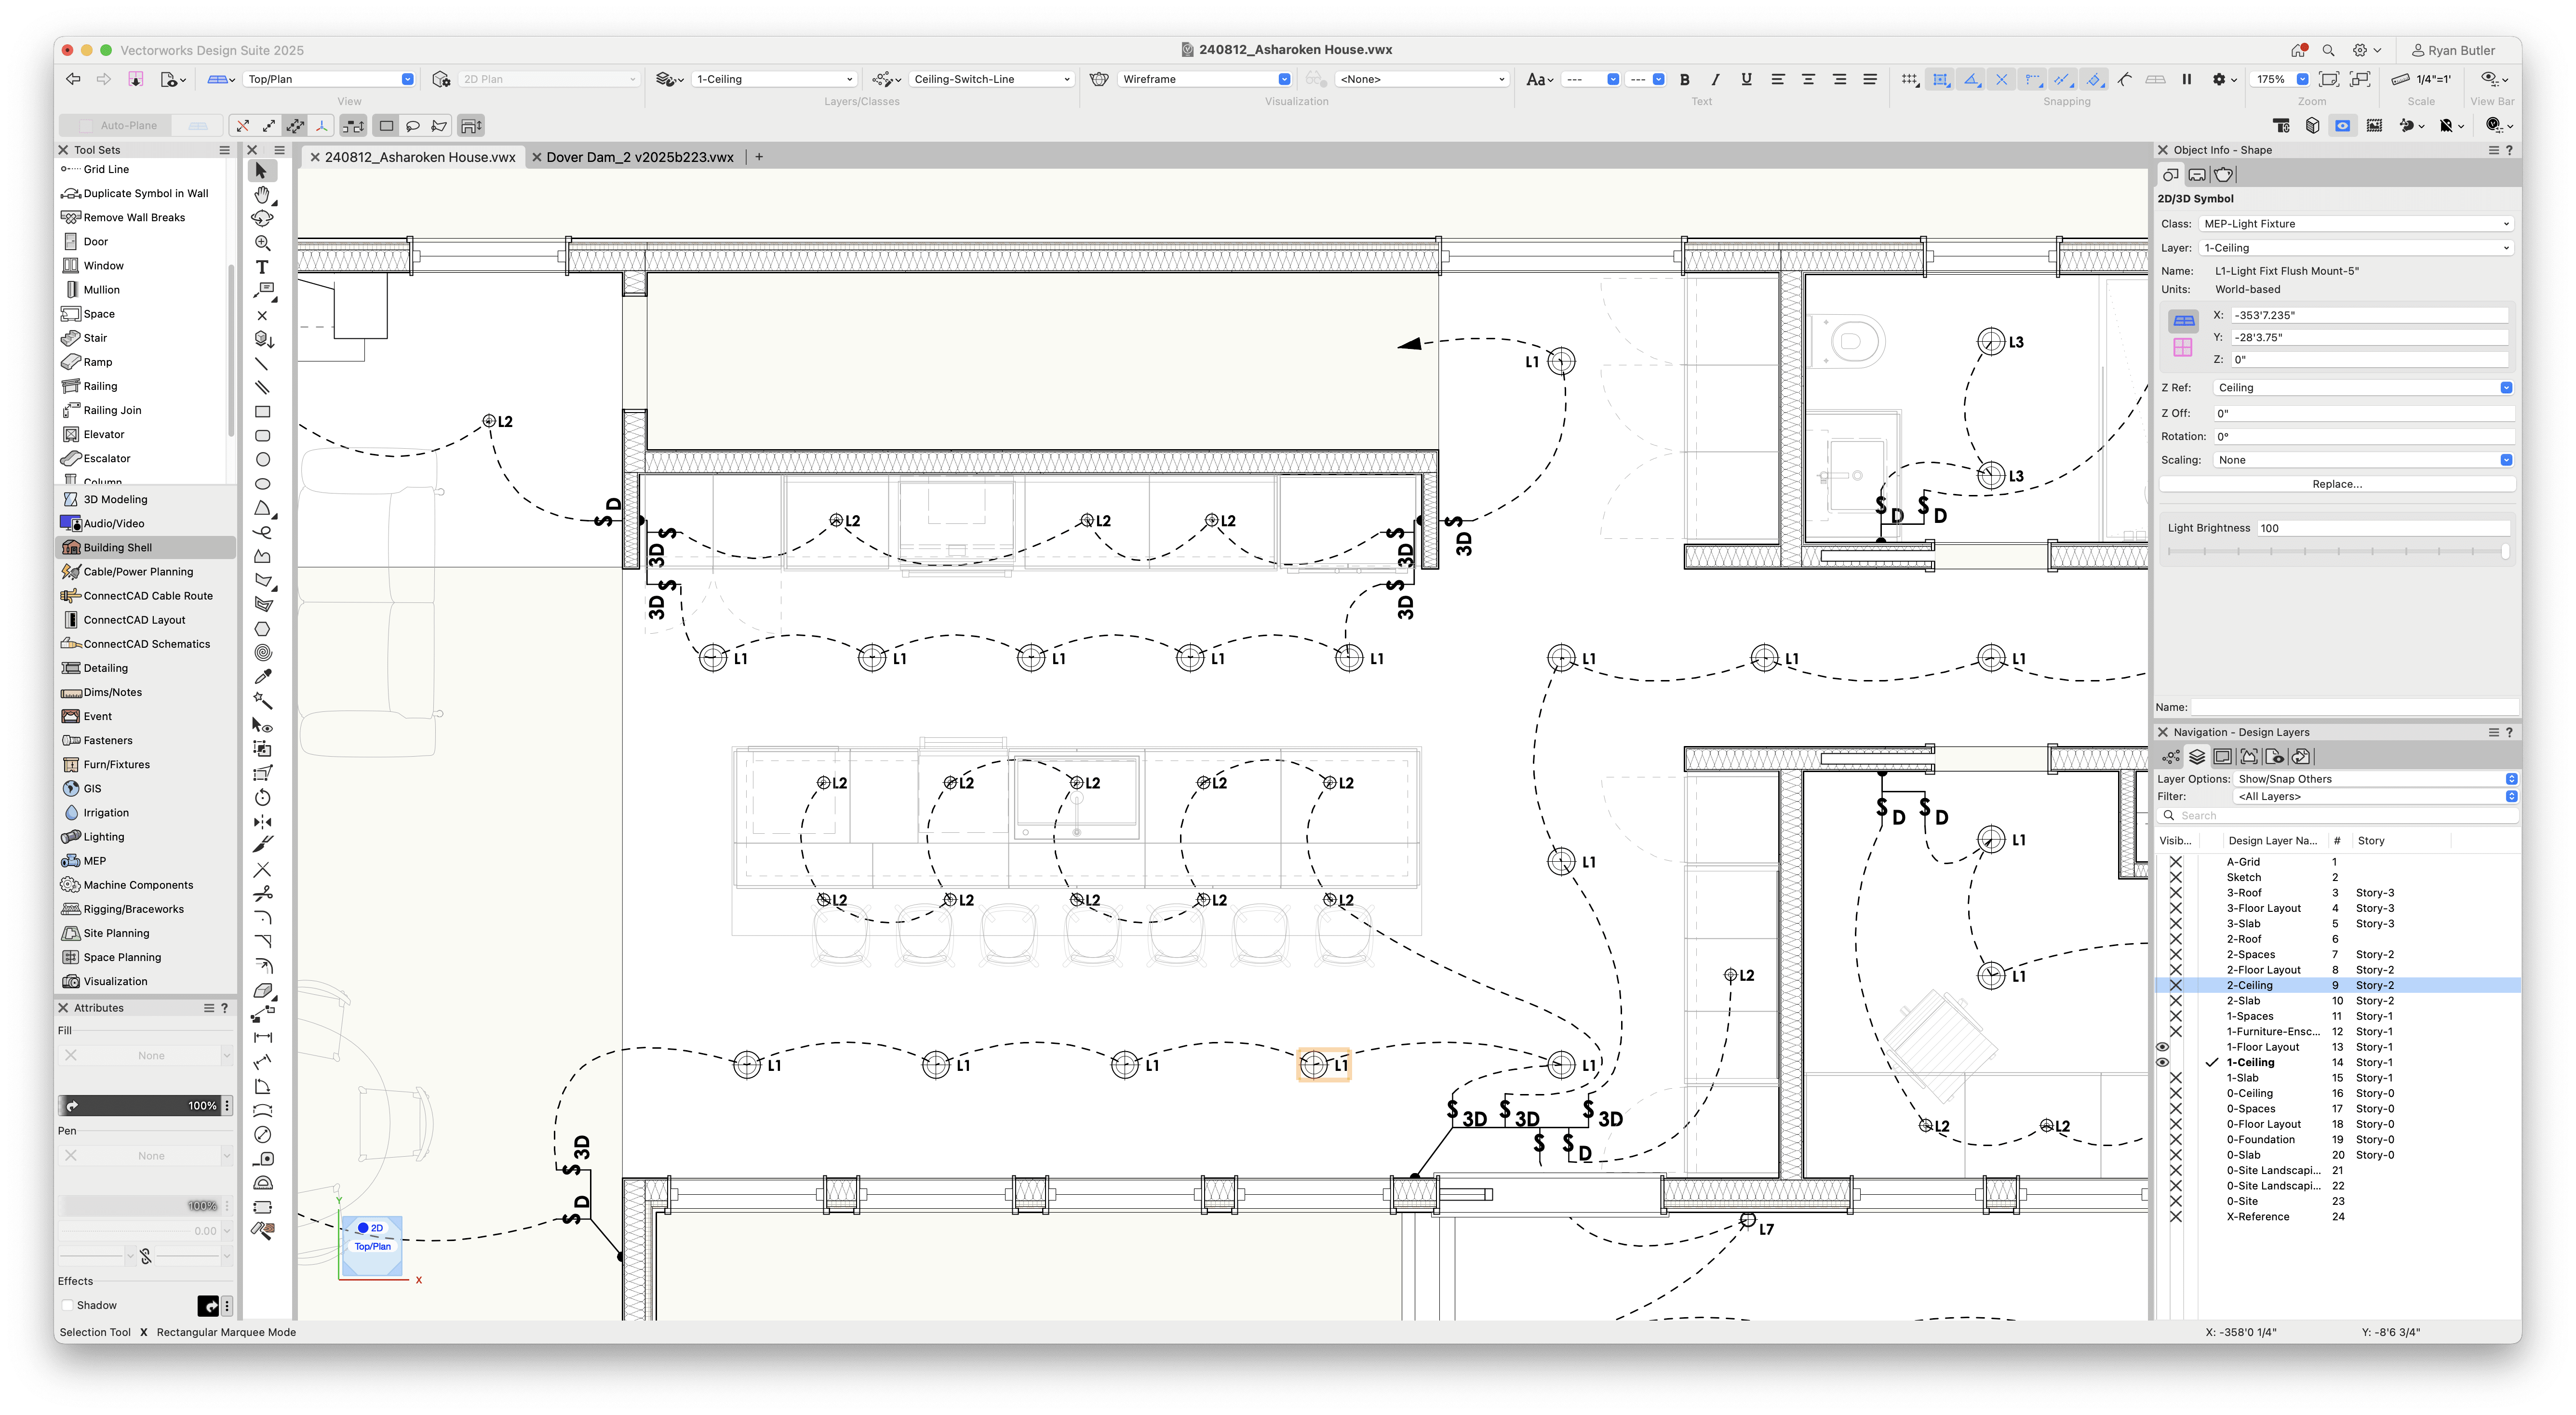
Vectorworks Architect’s MEP tools allow easy layout adjustments for HVAC and other ceiling-mounted equipment to fit seamlessly into your design.
Creating Reflected Ceiling Plans
Now, let’s talk about the practical steps you’ll need to take to create visually appealing and legible RCPs.
While your RCPs can be extremely informative and chock-full of data, they don’t have to be overly cluttered.
Carefully managing your class and layer visibility is one way to make an RCP. Using a dedicated ceiling layer helps keep all ceiling-related objects organized and ensures proper visibility throughout the project. You can control the visibility of different elements by turning off or graying out specific classes, such as door leaves and swing lines (even though an RCP typically doesn't show either of these.)
Creating RCP’s on your dedicated sheet layers can be done with effective use of class and design layer visibilities. Simply show the elements you modeled for the ceiling design in a 2D Top/Plan view and create a viewport. You can also take advantage of Viewport Styles to quickly apply the correct visibilities of objects and to apply the graphic appearance needed for consistency throughout your document.
Add any annotations to communicate all information needed. Add dimensions, data tags, graphic legends, and more.
Data visualization is another powerful tool in your Vectorworks toolkit. You can apply Data Visualization to any Viewport. For reflected ceiling plans, this can be useful for changing the modeled object’s graphic attributes. For example, you can use colors to locate light fixture types on the plan or assign hatch attributes to horizontal ceiling surfaces. Taking advantage of data visualization allows you to clearly differentiate elements and make your plans easy to read.

Every project — large or small — needs detailed RCP to ensure the ceiling design integrates smoothly with the overall building, enhancing both function and aesthetics. With Vectorworks’ flexible workflows, producing clear reflected ceiling plans directly from a BIM model is an effortless process.
Now, there’s nothing left for you to do now but begin practicing with RCPs:
Practice with RCPs
Explore documenting your own reflected ceiling plans with this free sample file from Vectorworks University.
Stay in the know with the latest insights
Subscribers receive news, customer stories, success and learning tips, event information, and other important announcements form Vectorworks.
By submitting this form, you agree that Vectorworks, Inc. and its authorized partners may contact you in regards to news, offers, and the use of our software, services, and platforms. Learn more about our privacy practices and your data on our privacy page.*