Are you getting started as a lighting designer? Or are you simply curious about what lighting designers do to bring amazing productions to life?
Look no further. This article will shine a light on everything you want to know about light plots.
What’s a Light Plot?
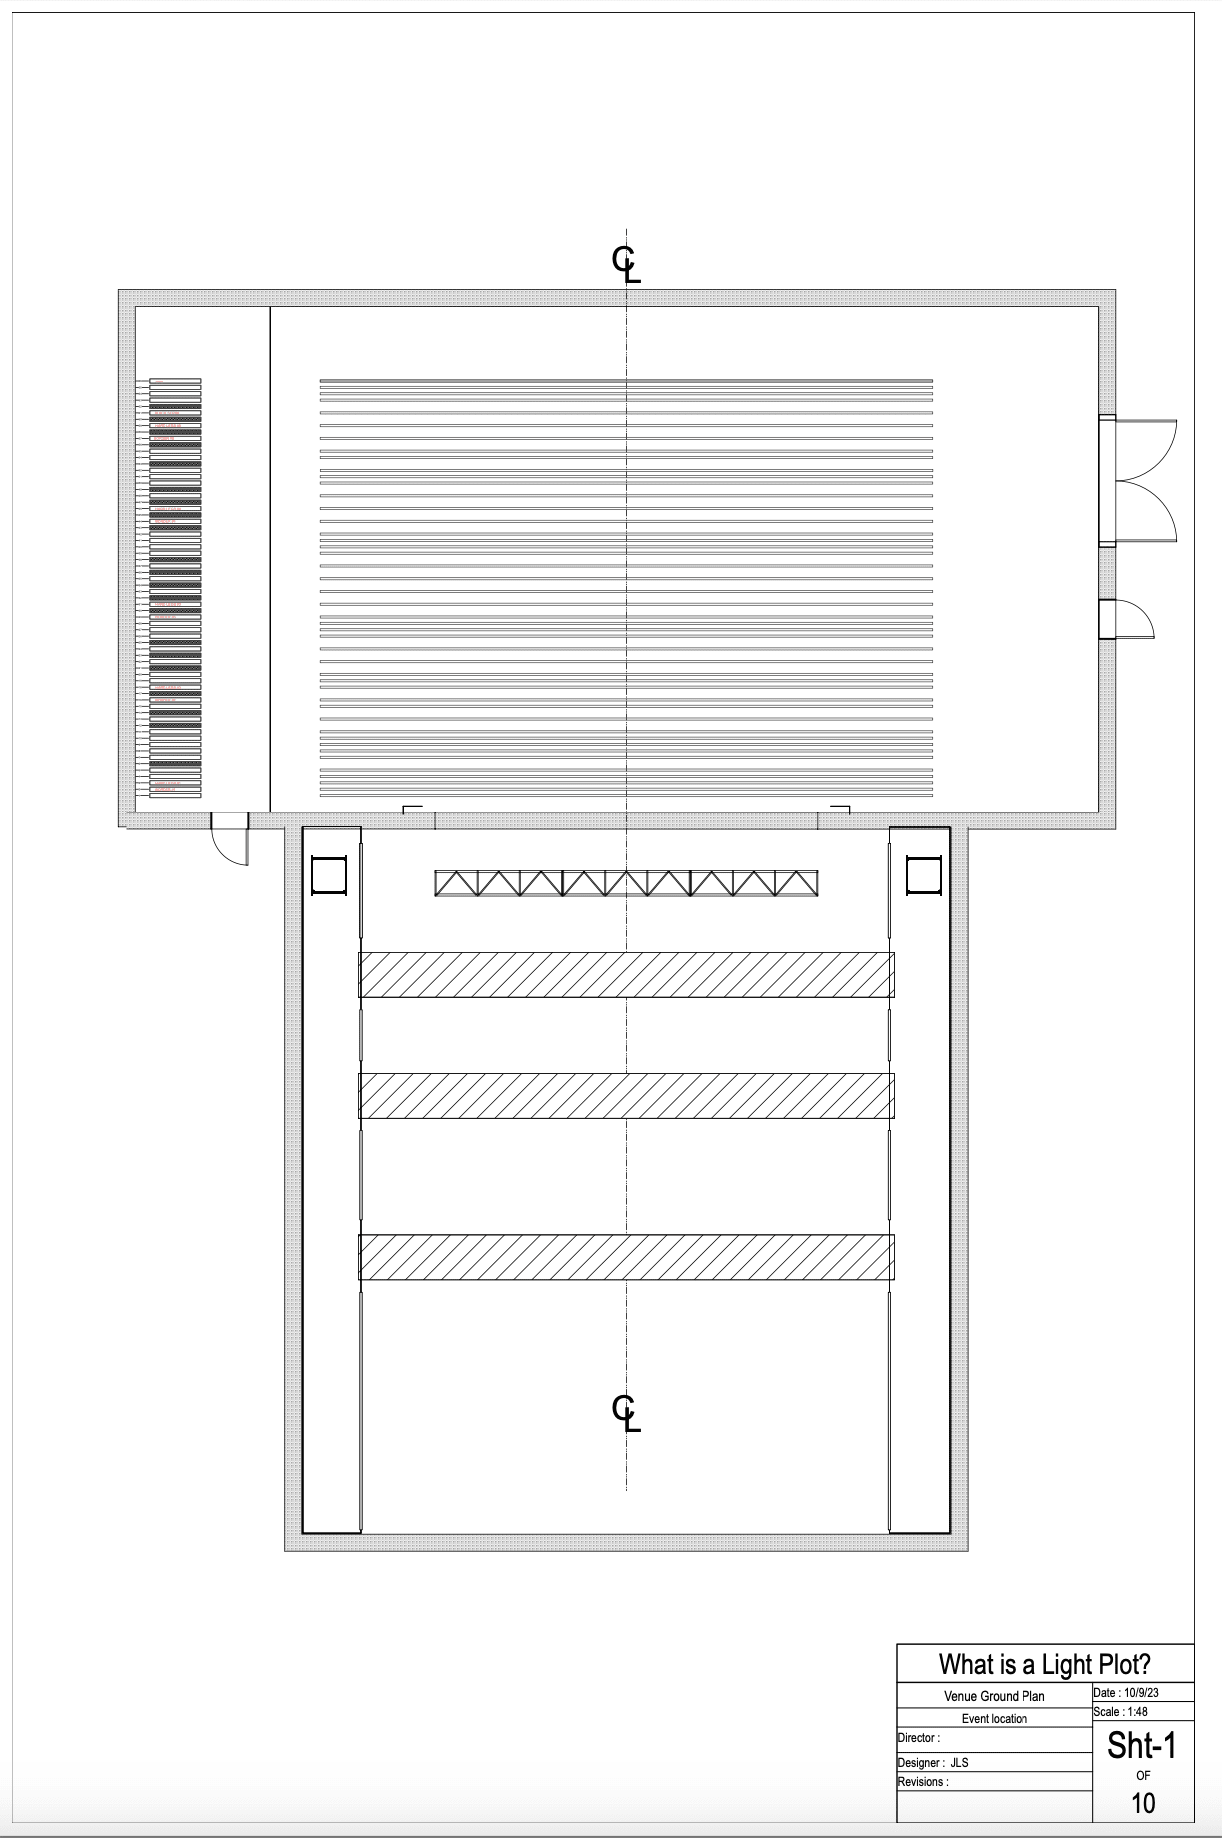
A light plot is a schematic drawing that shows where lighting instruments are placed in relation to each other, the architecture of the theater or venue, and where any scenery there might be.
Simple light plots only need to be 2D, since they are presented in a bird’s-eye view known as a “plan view.” Sections and elevations can be created to help understand where the lights are in 3D space.
Steps to Drawing a Light Plot
To create a light plot of your own with Vectorworks Spotlight, follow these steps:
Step 1: Familiarize Yourself with the Subject
Make sure you understand what you’ll be lighting. If you’re lighting a musical production, for example, read the script and listen to the music that will be performed.
As you do this, write down your ideas about when and where the music occurs. Note the production’s emotional overtones and what the music is about, as well. These ideas you come up with will be implemented into your light plot.
Step 2: Create a Ground Plan
Next, begin drawing the venue. This is called a ground plan, which is a flattened, 2D view of the scenery and venue.
Typically, your ground plan is drawn in 2D on a layer labeled either “Venue” or “Architecture.”
If you want to draw the venue in 3D, you can use the Wall tool or trace polygons and extrude them to the correct height of the venue.
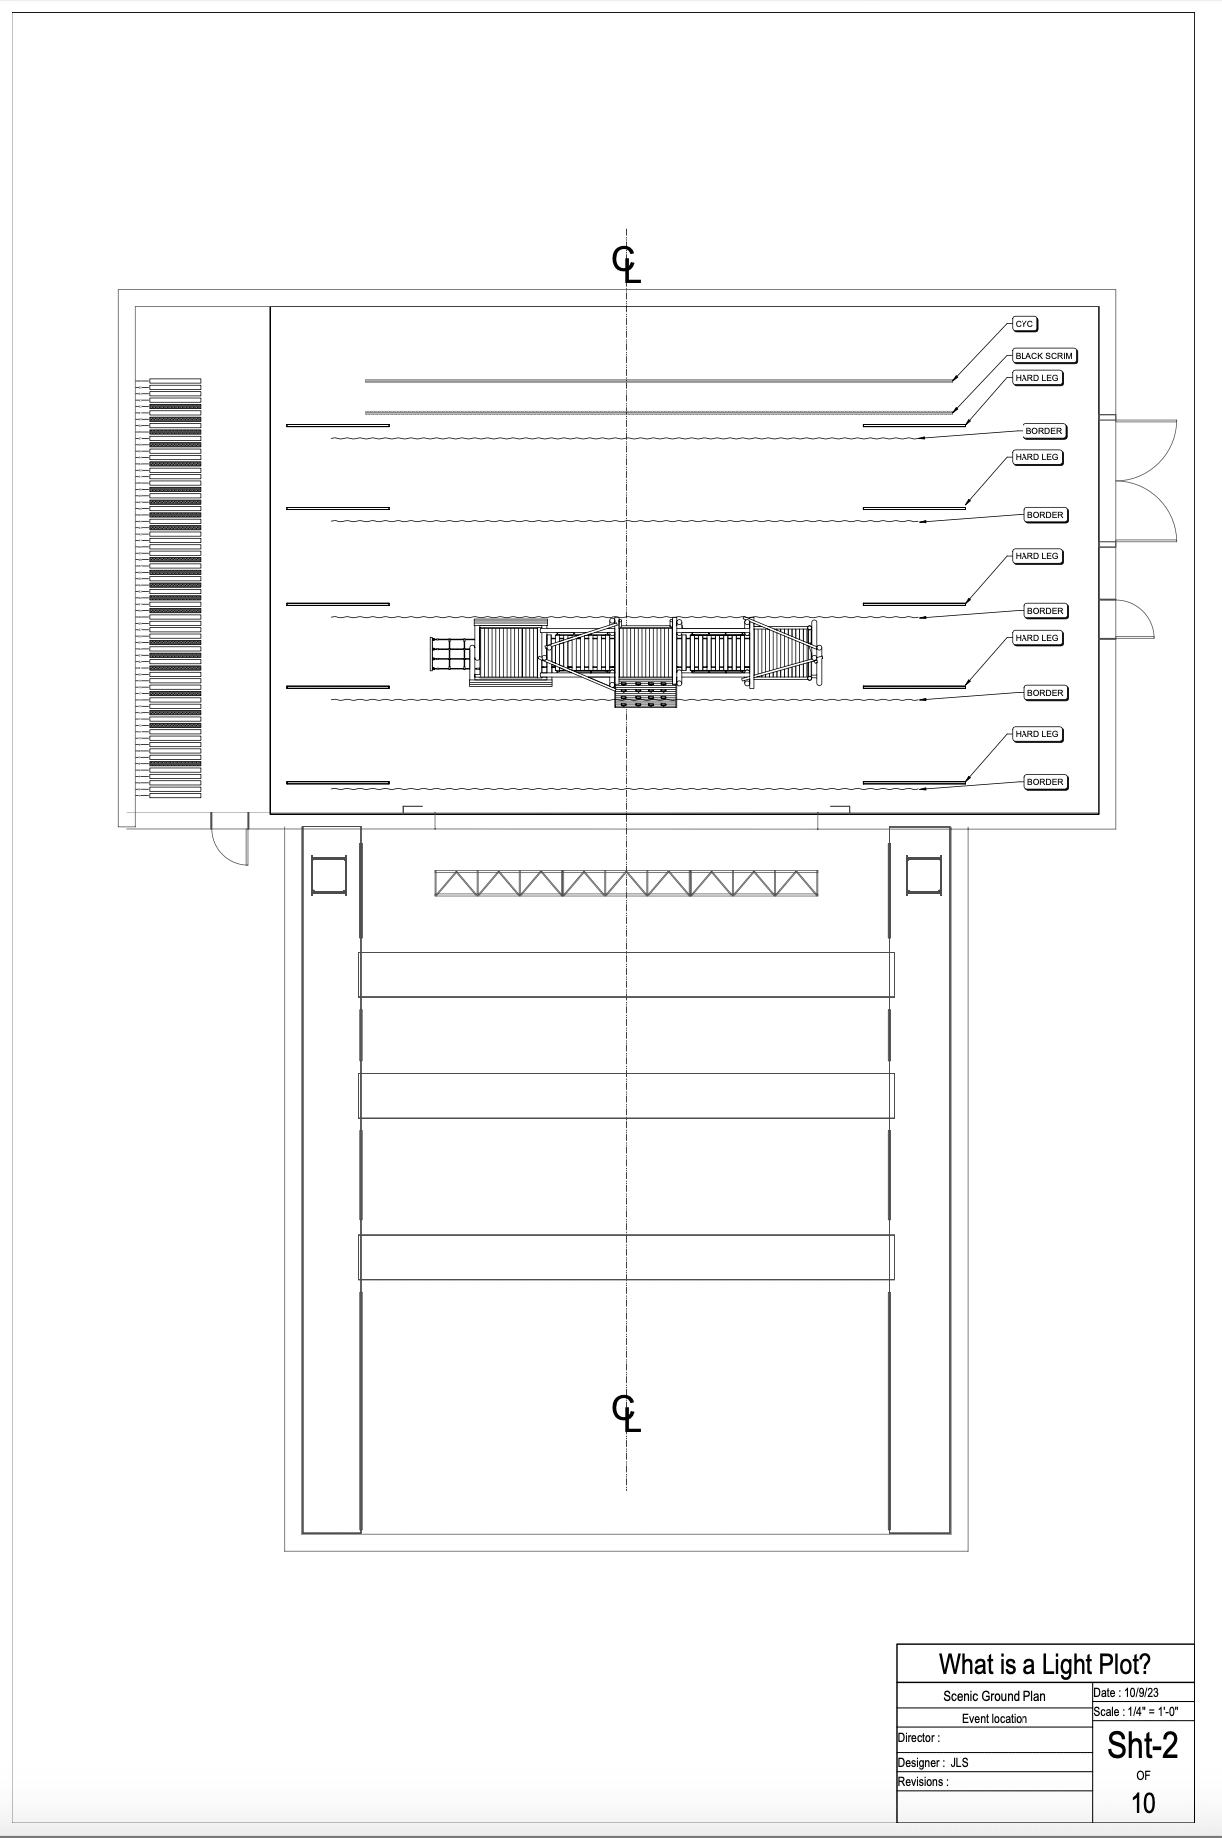
Step 3: Draw Scenery
On a new layer, draw the scenery that’s provided to you by the scenic designer. Label the layer “Scenery.”
If the scenic designer also uses Vectorworks Spotlight, you can use Viewport Referencing to import their design. The scenic layer should include all borders, legs, and curtains, as you’ll need to make sure these objects will not interfere with the lighting of your production.
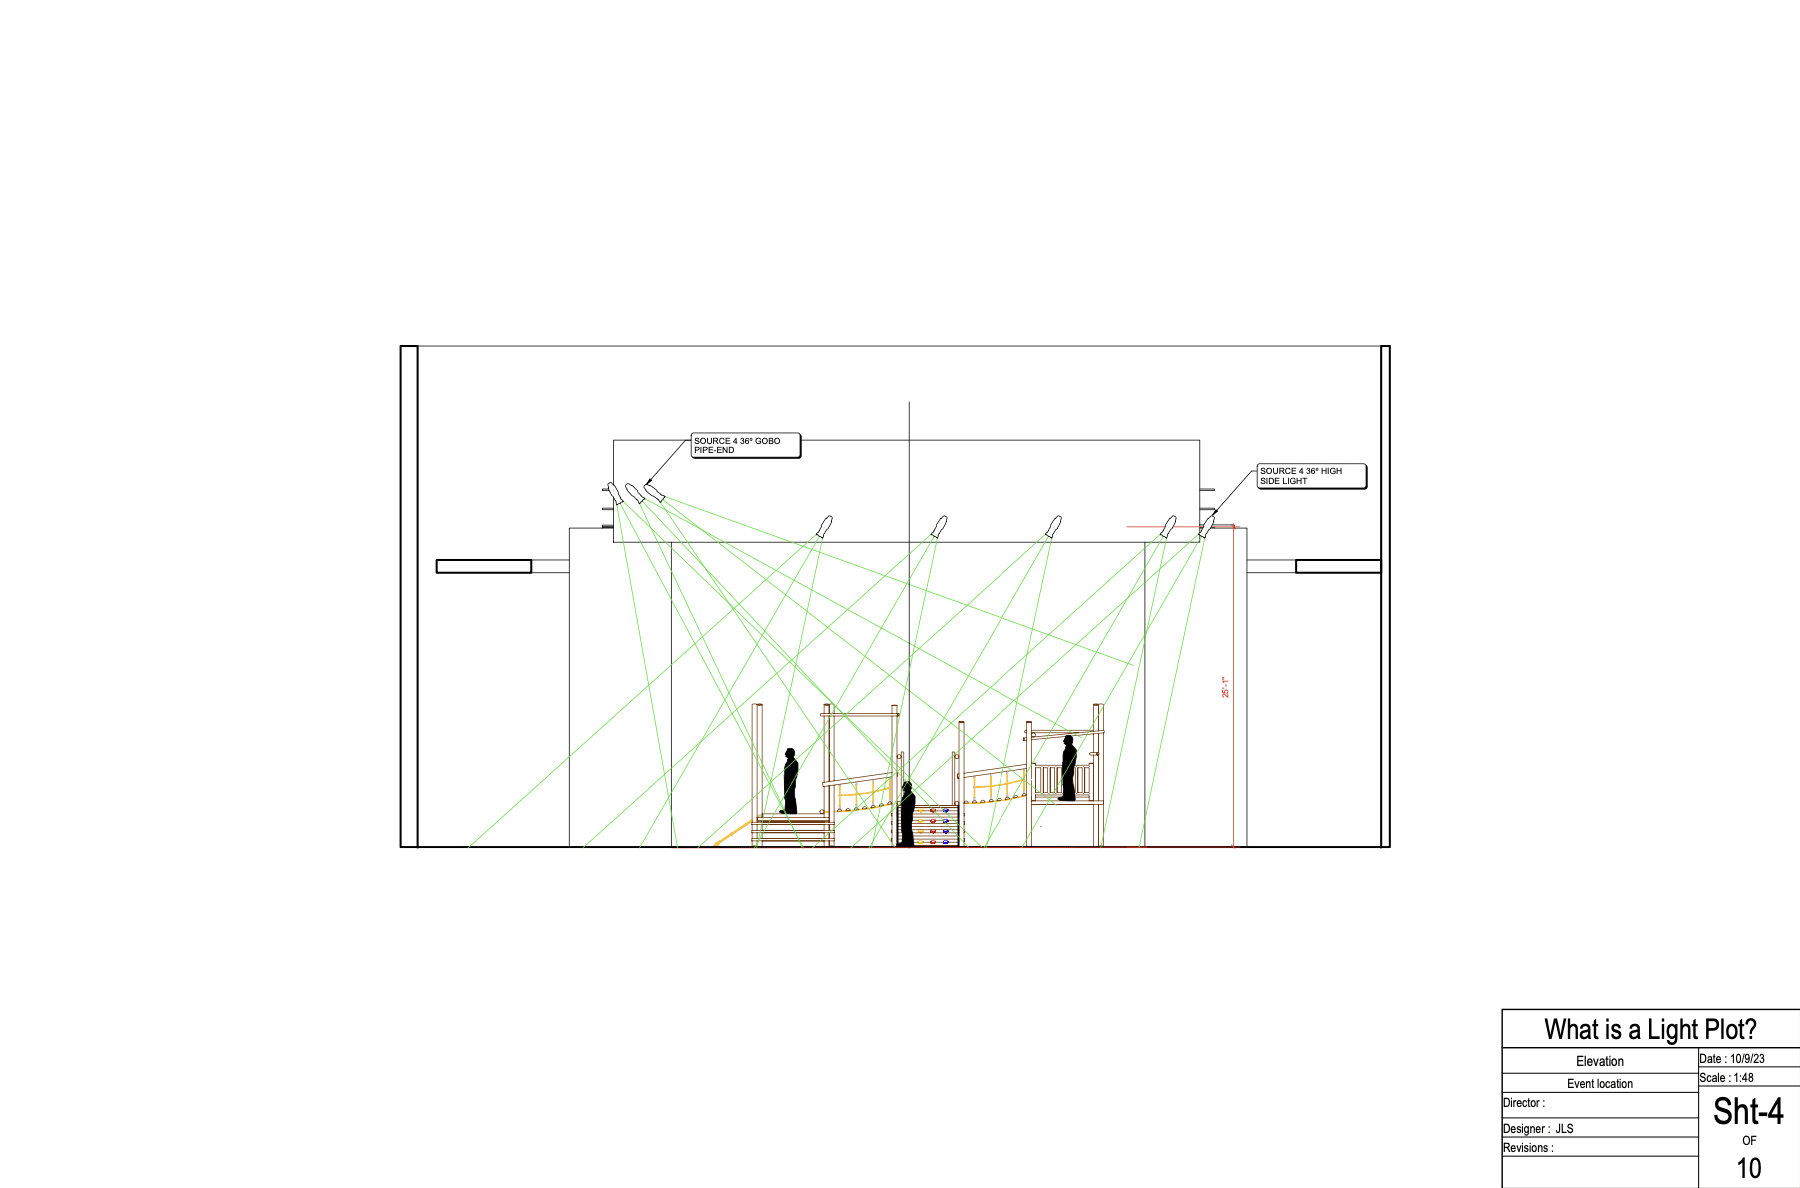
Step 4: Draw Your Section
The next step is to draw a side view of your venue, also known as a lighting section.
If you’re drafting in 3D, you can use Clip Cube, the Create Section Viewport command, or the Section Solids command to have Vectorworks do all the work for you.
If you’re working in 2D, you’ll need to draw your section on its own layer. The section will help you determine the lighting angles and fixture types for the front and backlight. Typically, you’ll use ellipsoidals or lekos for the front light and parcans or fresnels for the backlight.
The section will also determine the trim heights of the lighting pipes for the audience’s sightlines.

Step 5: Create Elevations
The elevation will help determine the side light angles and the types of lighting fixtures you’ll need. These fixtures are typically ellipsoidals.
If your elevation is a 2D drawing, it should be on its own layer.
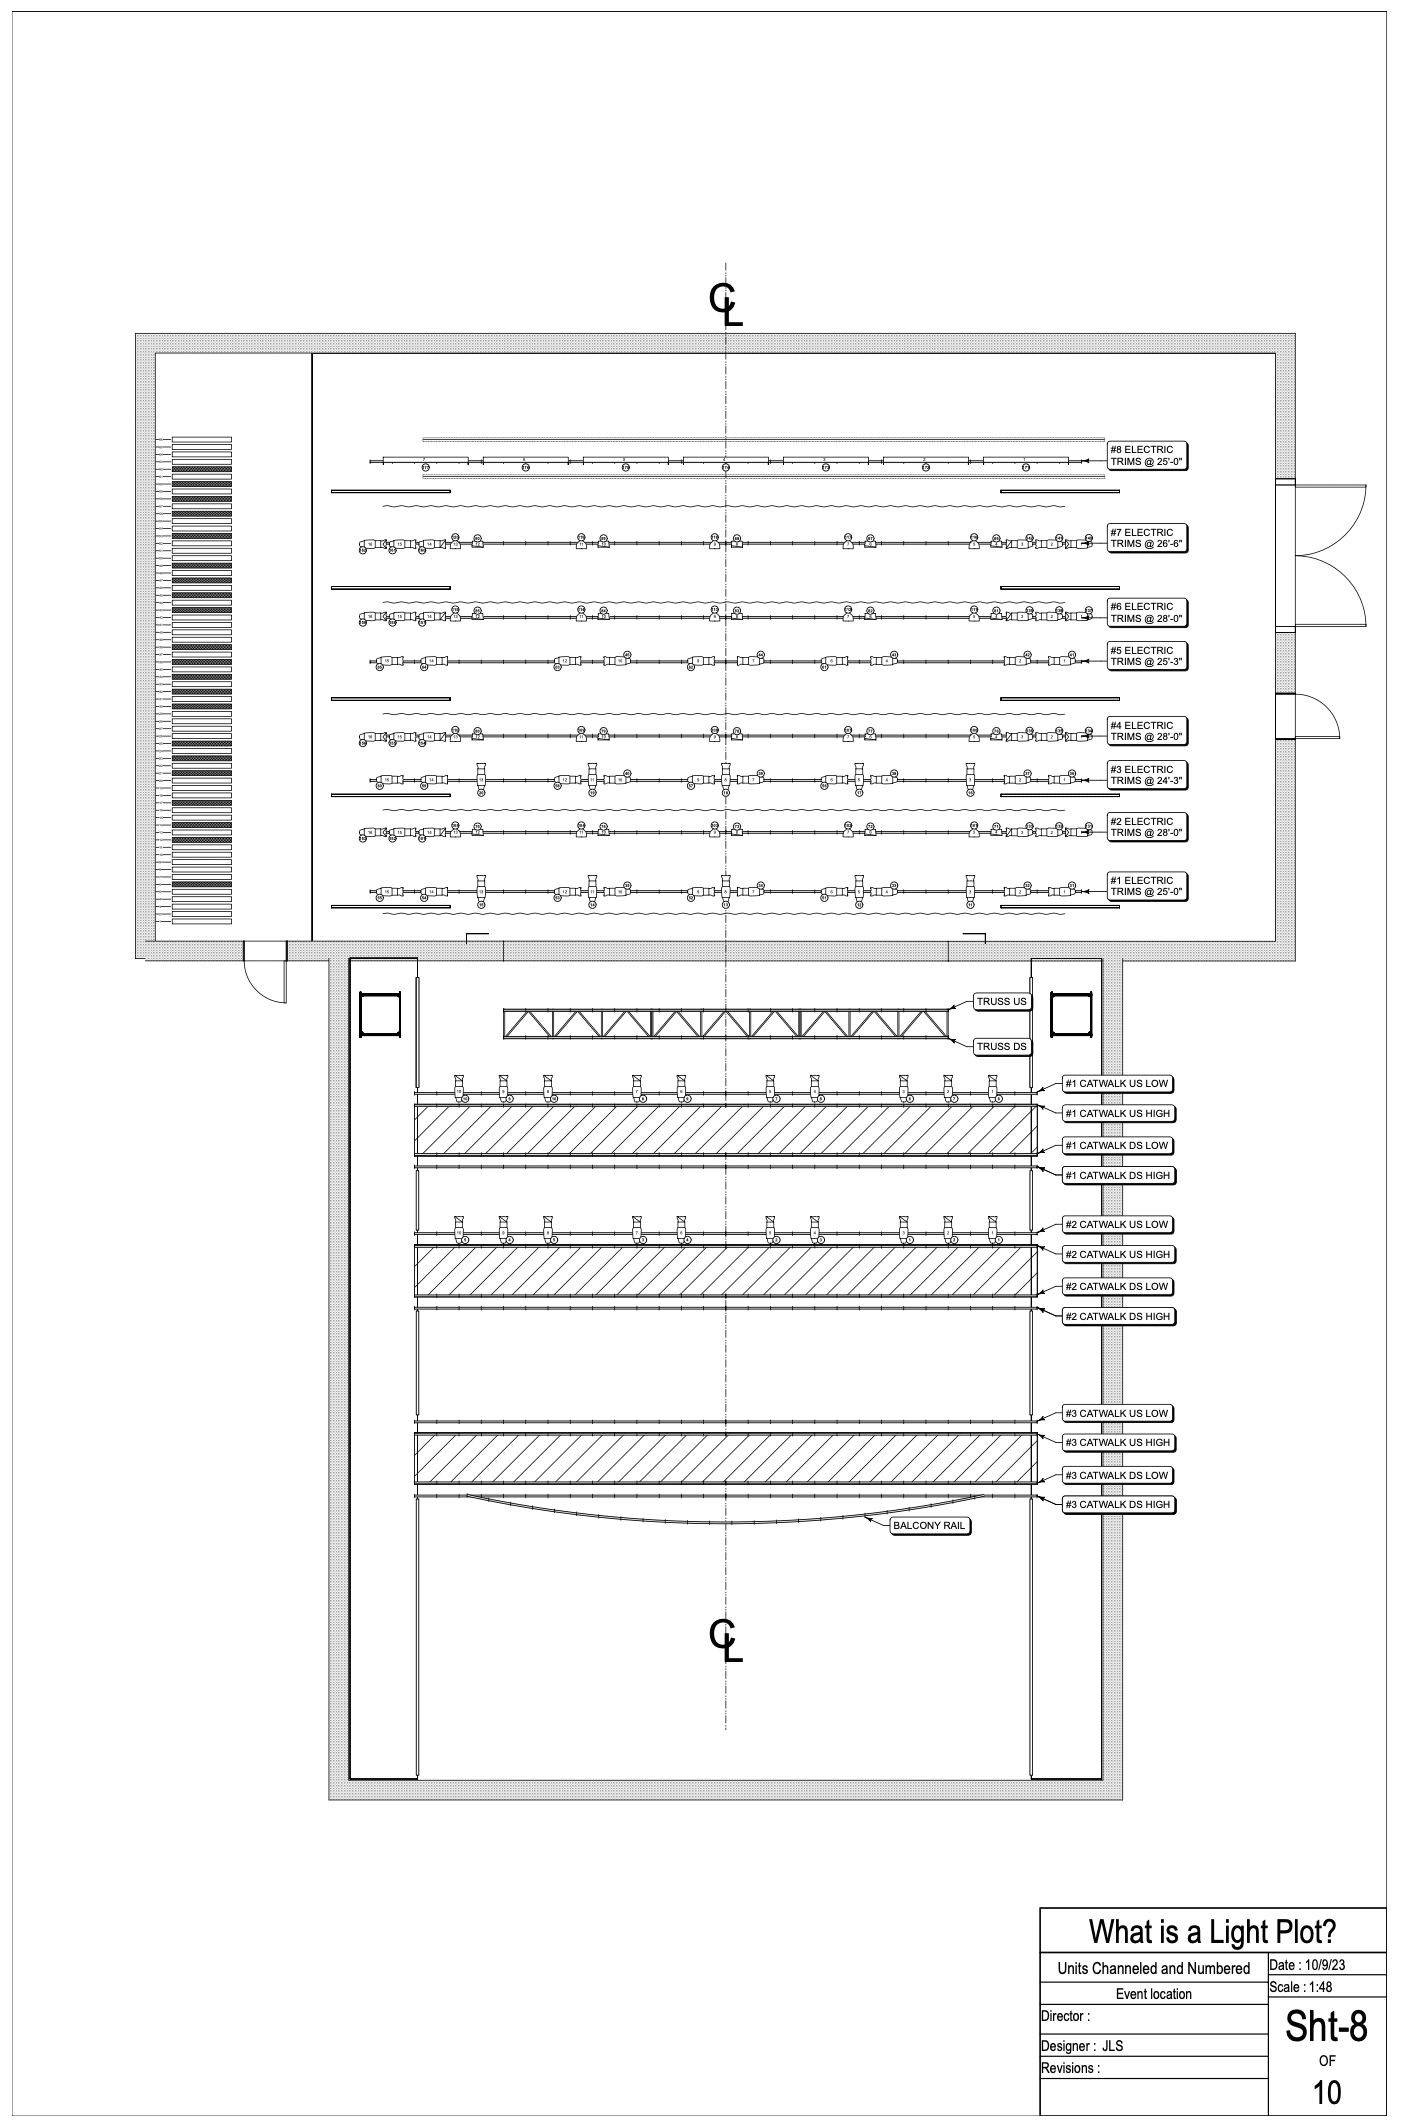
Step 6: Place Electrics
To draw the light plot, use your previously created section to determine where to place the electrics on the downstage and upstage plane.
The way you label lighting positions is very important. Lighting positions are labeled from the proscenium or plaster line going both downstage and upstage, and from stage left to stage right.
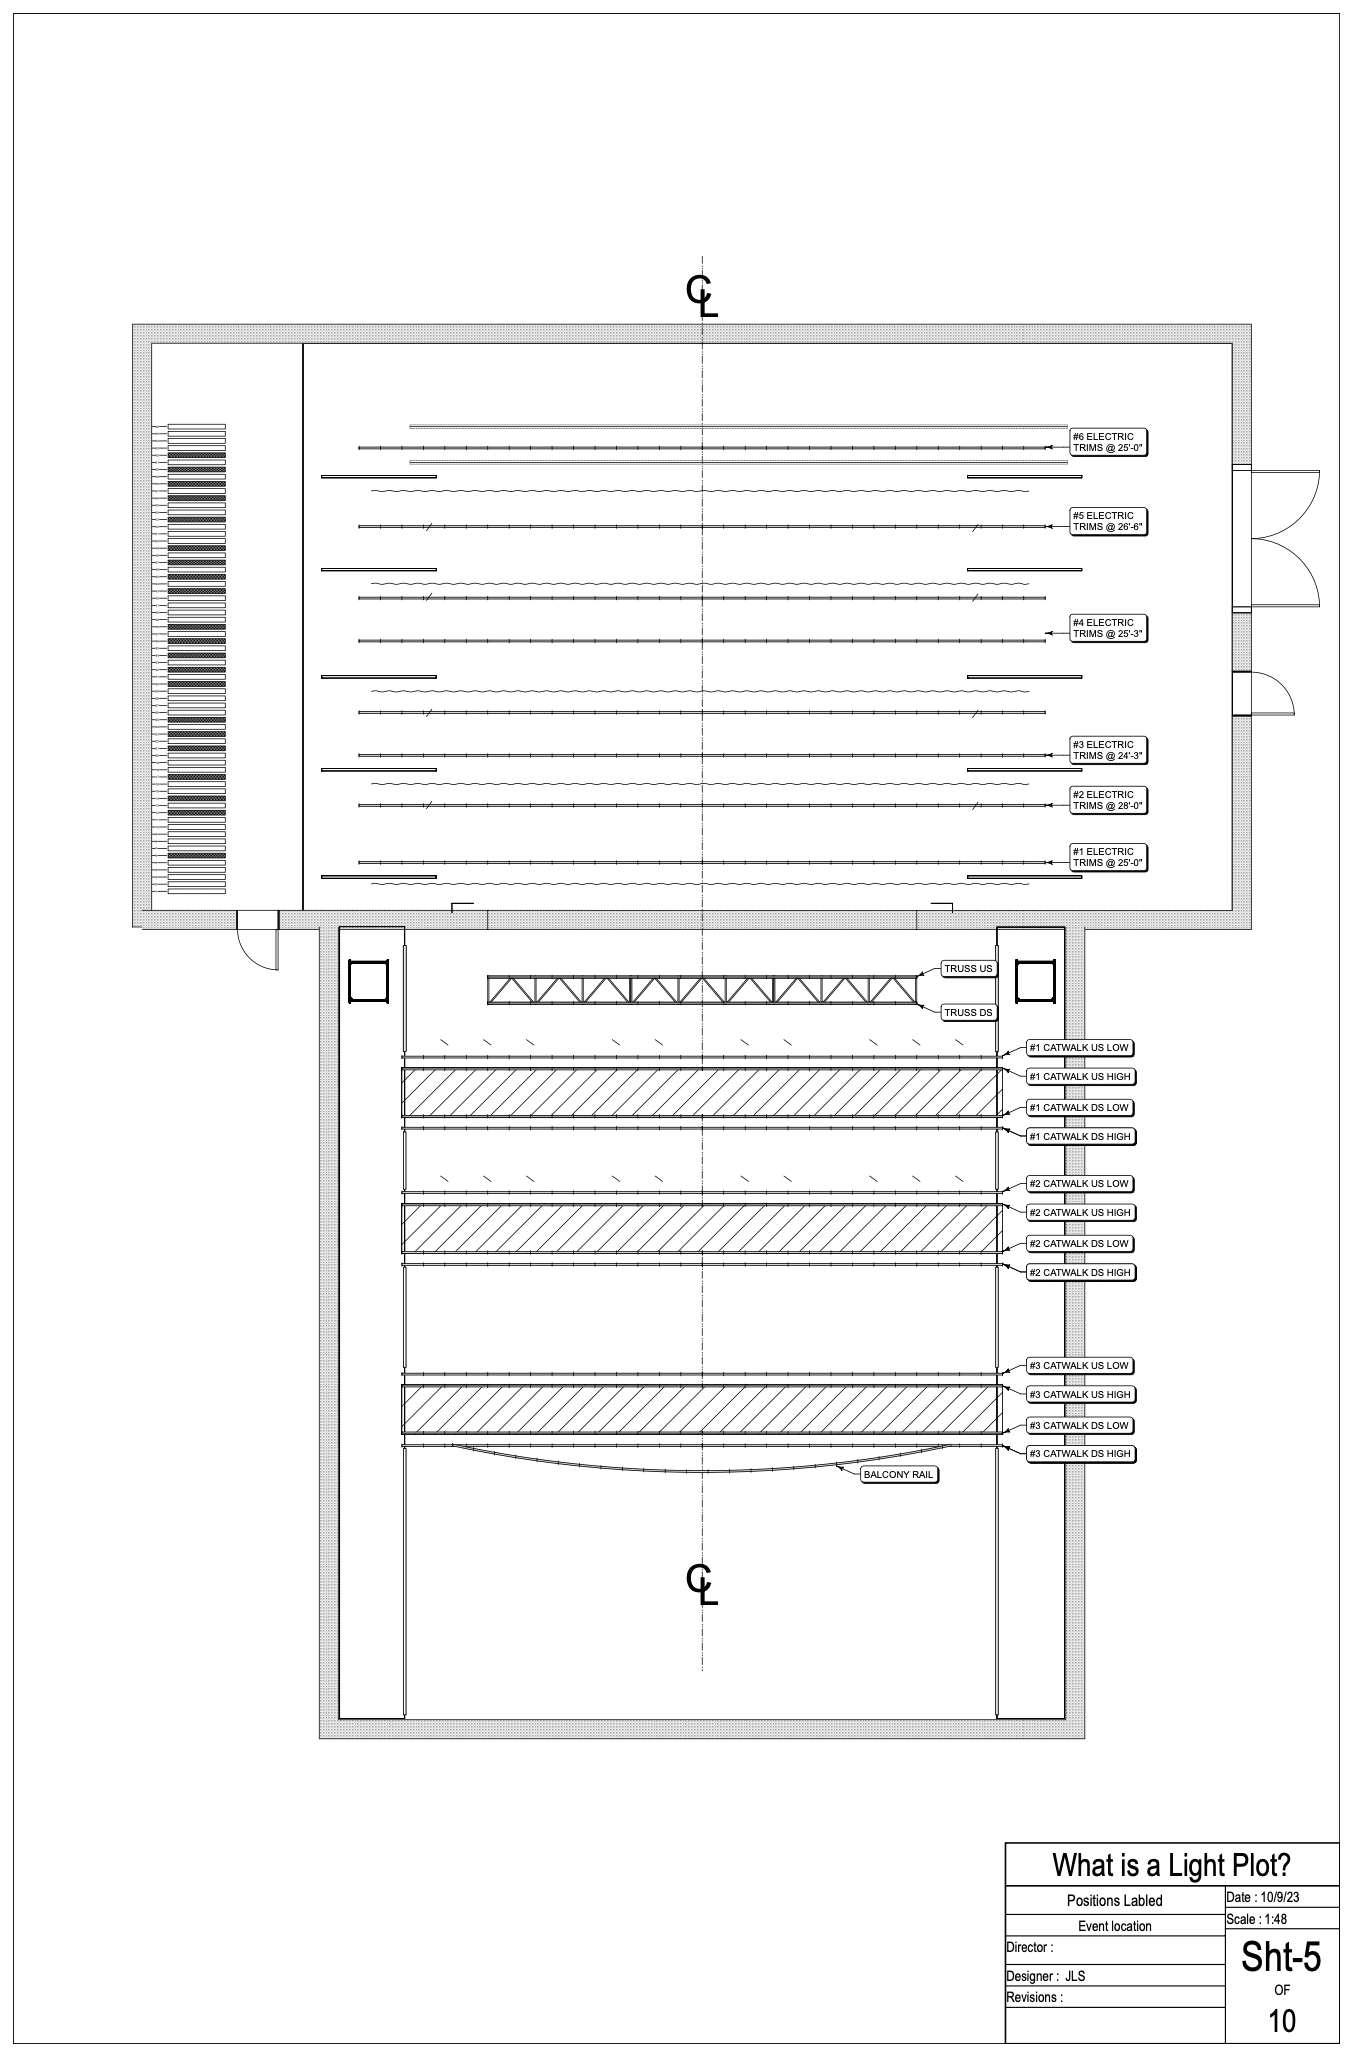
Starting at the proscenium, the first lighting pipe is “#1” or “1st Electric,” and then the “#2” or “2nd Electric,” and so on until you have all of your upstage lighting labeled.
Moving downstage from the proscenium, you’ll begin labeling again. The closest position to the downstage edge of the proscenium will be “FOH #1” or “Catwalk #1.” As you move further downstage from the proscenium, you’d label the next position “FOH #2.”
If you have a lighting grid, the grid pipes are labeled in the same manner, denoting upstage and downstage. However, these are labeled from “Pipe A” at stage left, moving to “Pipe B” as you head stage right.
So, for example, “A pipe,” “B pipe,” and “C pipe.” Lighting terms or box booms in the audience or front of house are then labeled as “SL #1 Box Boom,” “SL #2 Box Boom,” and so on.
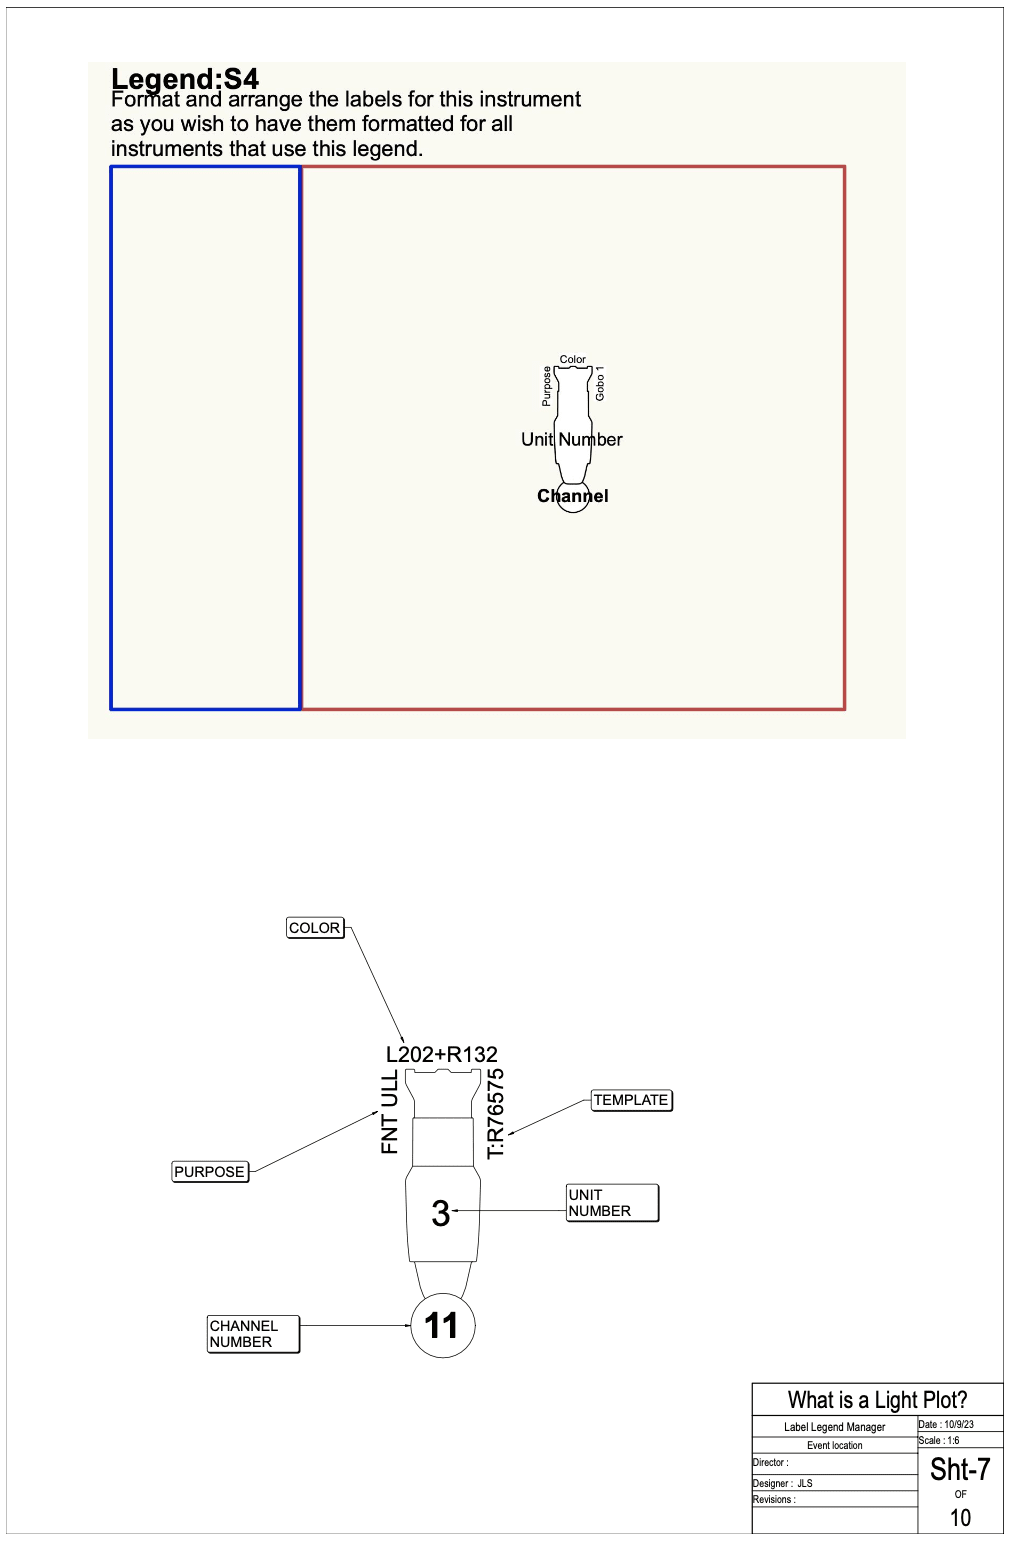
Step 7: Set Up a Label Legend
Before you get to channeling and unit numbering, you’ll need to set up a Label Legend. Label Legends are unique to Vectorworks Spotlight, and they’re a graphical representation of how the information relates to a lighting instrument. Your Label Legend can be displayed in 2D or 3D space around a light.
For more on creating a Label Legend, click here.
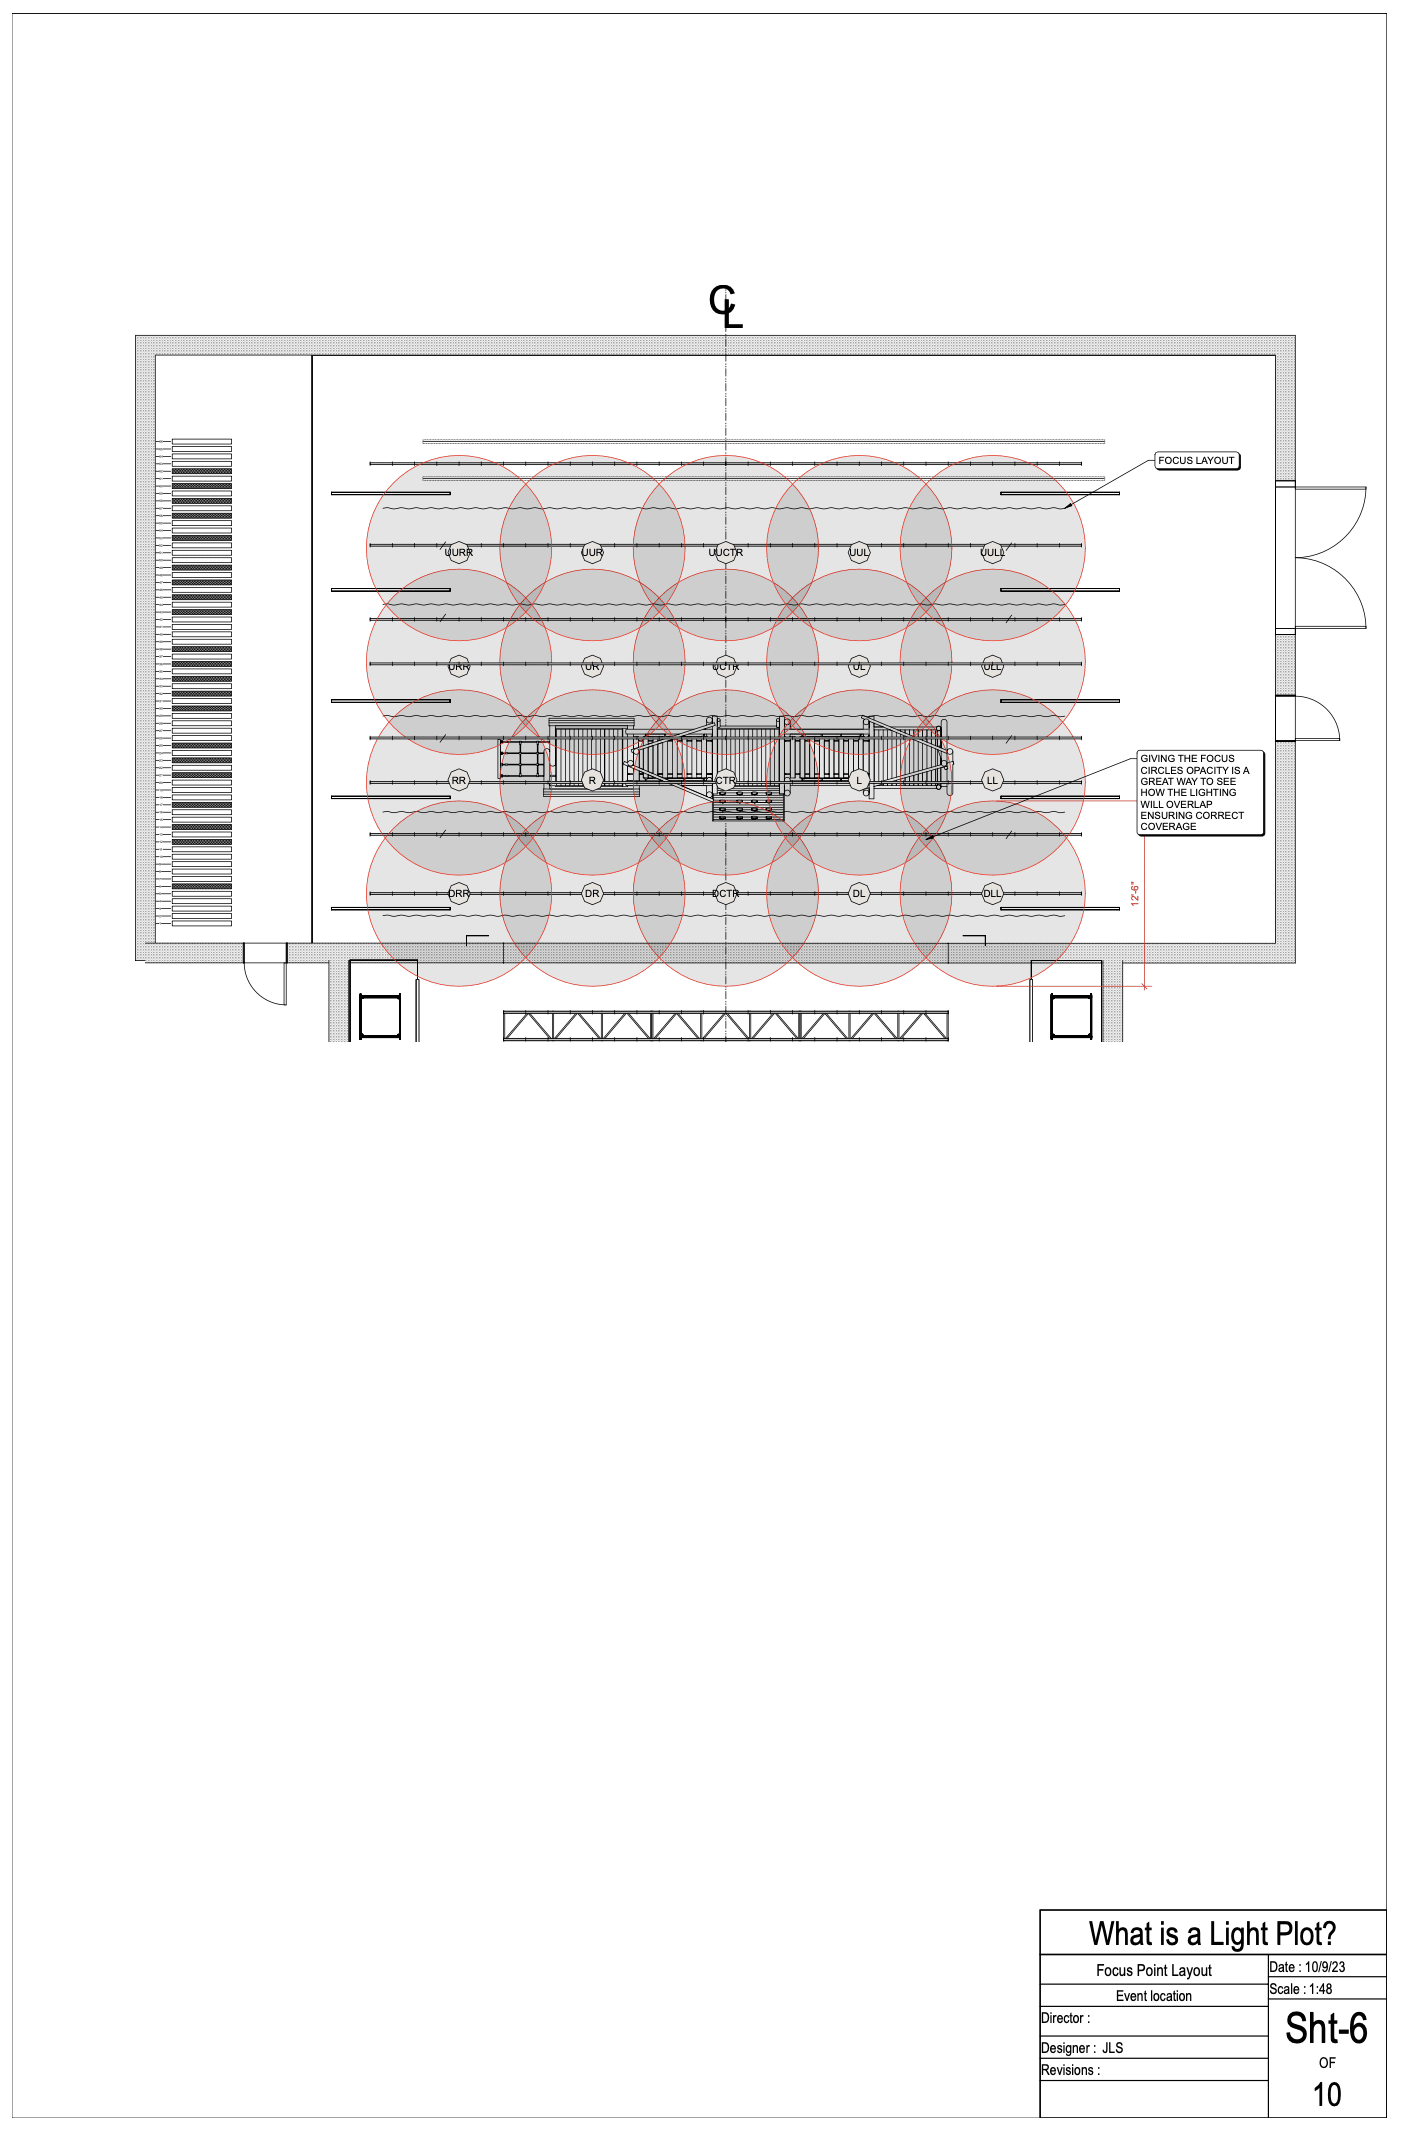
Step 8: Place Overhead Lighting
You’ll now use the elevation in combination with the section to place your overhead lighting. You can also use focus points or focus circles to make sure that the whole stage is evenly lit.
Lighting instruments are numbered from stage left to stage right again.
Step 9: Organize Your Light Plot for Control
Channel numbering organizes the lights in a plot in the manner you want to control them.
Channel numbers do not have to equate to dimmer numbers, as modern lighting consoles have what is called “soft patching.” This allows you to channel any way you want. One common method of channeling is to think of the different groups of lights as “systems.”
You’ll have a front light system, a backlight system (or two if you’re using two-color backlight), a cross left (or xl) sidelight system, a cross right (or xr) sidelight system, and maybe some gobo or template systems. You can start with the first light that will illuminate the downstage left-most corner of the stage and call this “Channel 1.” The next light onstage would be “Channel 2” and so on across the stage in a single lane.
Step 10: Choose Your Colors
Color choices are another important tool lighting designers use to help tell the story onstage.
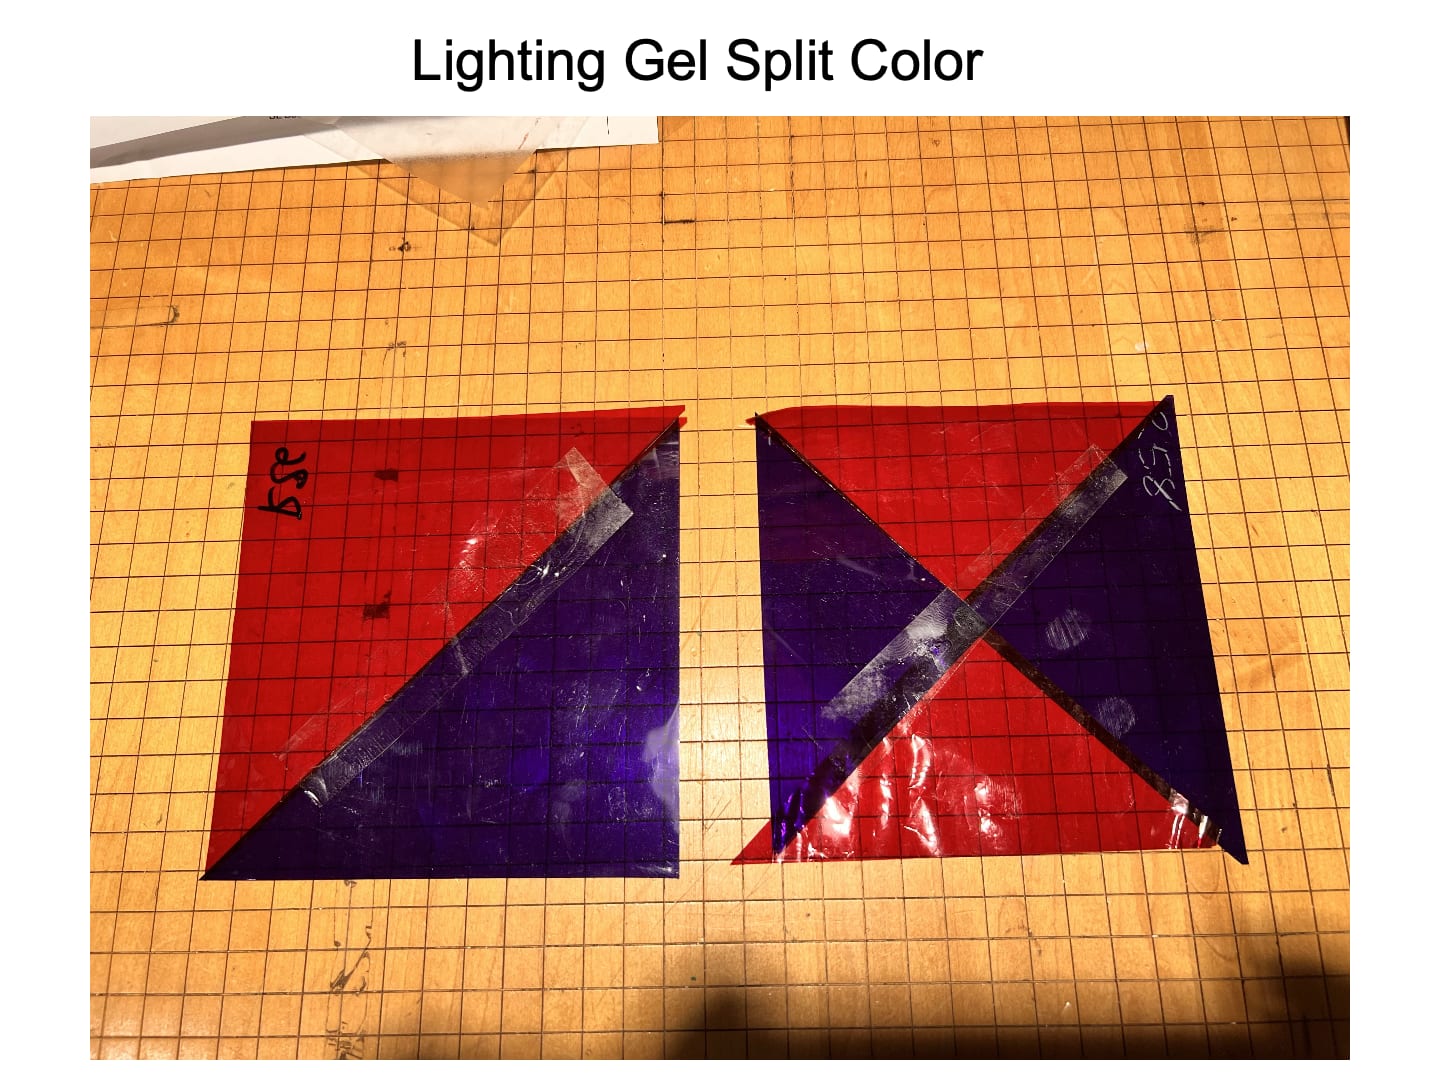
There are hundreds of colors or gels you can choose from, and many LED lights allow for literally millions of color choices. In a traditional light plot, color is indicated by a letter representing the color manufacturer and a number representing their specific color. So, you might have “R80” (Rosco 80 Primary Blue) or “L152” (Lee Pale Gold).
You would also put diffusion in the color field. Diffusion is used to soften the light or to change the beam of the light. If you use color and diffusion in a light, you would say “R80+R132” (Rosco 80 Primary Blue and Rosco 132 Quarter Hamburg Frost). This would indicate that there are two pieces of gel in a single light.
If you’re using a template or gobo in a light, you can experiment with split colors to achieve different effects. To indicate split color, you would enter a slash between the colors, so you would say “L164/R47.”
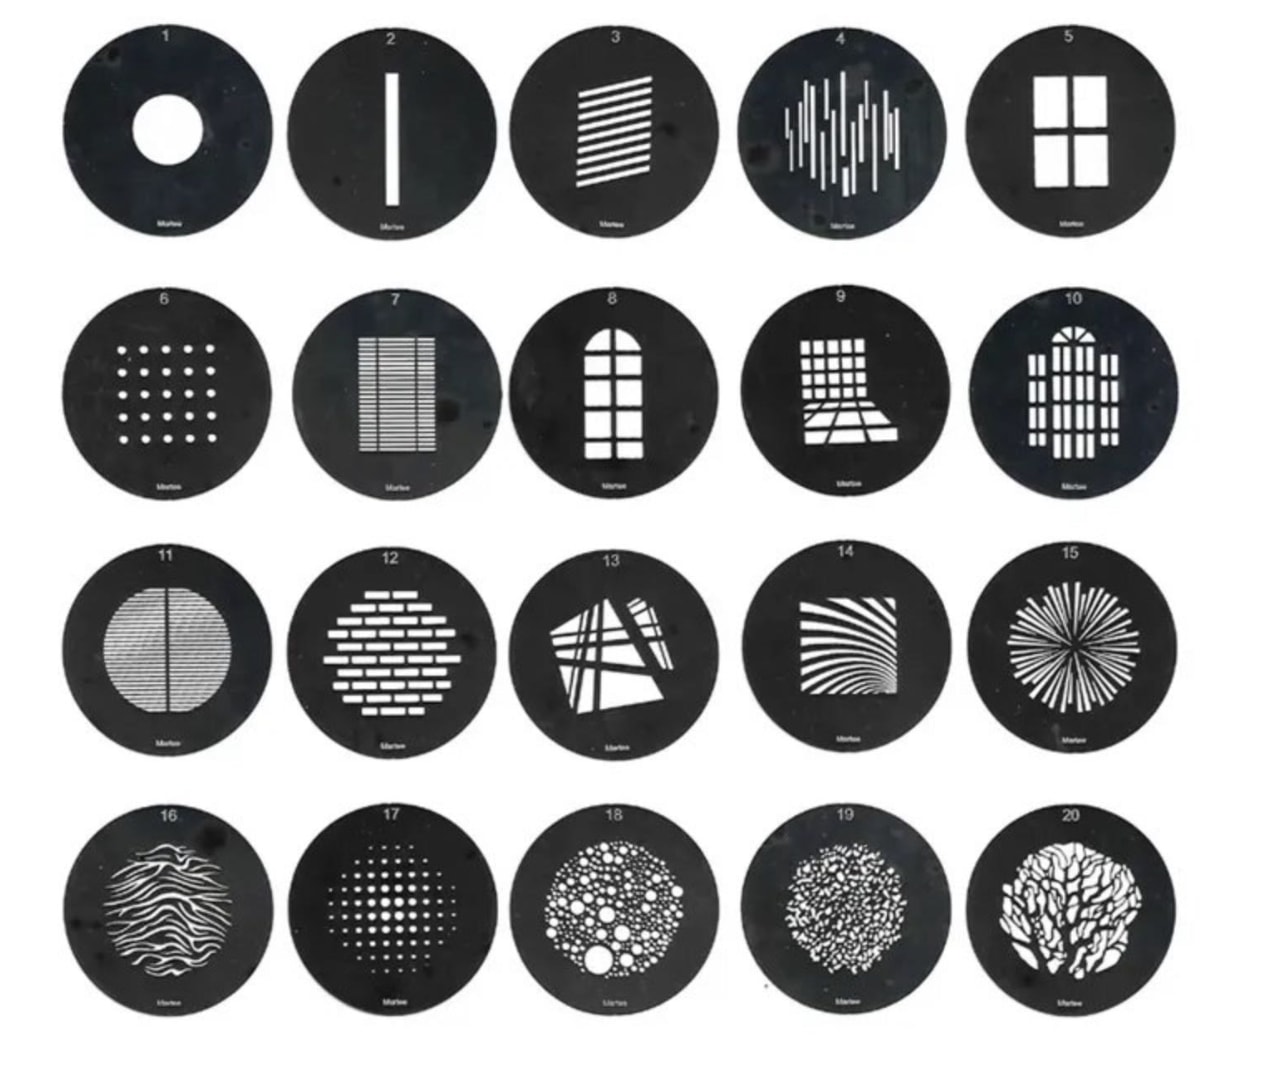
Step 11: Set Up Templates and Gobos
Ellipsoidal lighting fixtures can also take a template or gobo. Templates are metal, glass, or even plastic patterns that can be projected from the light. Gobos come in a wide variety of patterns. Some represent images like trees or leaves, while others are more abstract.
Note that many modern LED fixtures get hot enough to melt or damage plastic gobos, so you’ll need to check with the manufacturers to make sure you can use a plastic gobo in a particular light.
Step 12: Create Instrument Key and Title Block
After you have drafted your light plot, section, and elevation, and you have entered in all of the unit numbering, channeling, color, and template information, you’ll need to make an instrument key and a title block. If you are using Vectorworks, you can create a key using the Equipment Summary Key Tool.
You can also make a title block using the Title Block Border tool.
Developing Light Plots for Broadway

Image courtesy of Josh Benghiat.
Creating light plots for high-caliber projects is all about the details. Josh Benghiat, a New York City-based lighting designer, outlined his lighting process in the Vectorworks University webinar “Developing Light Plots for Broadway.”
For the Kenny Leon-directed “Our Town” production, Benghiat worked alongside lighting designer Alan Lee Hughes. Benghiat described the project and his workflow: “There were hanging lanterns over the set that we had to work around. Early sketches show the lanterns looping from the audience, across the stage. It’s a striking image. Set designers often throw lighting designers curveballs, but a great way to encourage collaboration is to make it look good and mean something. Even if it’s a pain later, it’s exciting to work with visually compelling ideas. These lanterns lit up, and we had to integrate them into our lighting design.”
“Other elements were challenging too — we had a large monolithic wall upstage and audience seating on both sides of the stage. This limited our ability to get under or around elements.”
“Lighting design often involves translating one intangible thing to another — starting with ideas, story, and conversations, and ending with an image on the retina. It’s abstract work, and the studio becomes the bridge between these intangibles. The more skilled you are at the studio work, the more clearly you can connect those concepts to the final image.”
“Other challenges included lighting the onstage audience. Normally, we might light under hanging elements using low angles, but we couldn’t do that here without affecting the audience. This was a black box space, so there were no wings — nowhere to hide equipment. The cast was an ensemble of 28, so we couldn’t just throw in moving lights and specials. We had to light the entire stage consistently, ensuring performers were lit wherever they stood.”
“The first step in my process is planning out areas. I think of areas as predictions: where the director will place actors, and where actors will naturally want to stand. You want hotspots wherever actors are, and control over light distribution. Some people draw circles around areas to show scale, which can be helpful. But I don’t usually use circles — they only work if you're relying on downlight pools. Since we have light from all directions, it’s more useful to think about focus and control — where light starts and stops — rather than volume.”
“For this show, we knew there were two houses and two families, so it made sense to define a stage right area, a stage left area, an upstage lane, a downstage lane, and a center. This gave us enough flexibility without overcomplicating things.”
“Almost every theater or set designer provides a 2D section, and if they don’t, I create one. It’s easier to conceptualize lighting from this side view, which mimics how the audience sees the stage.”
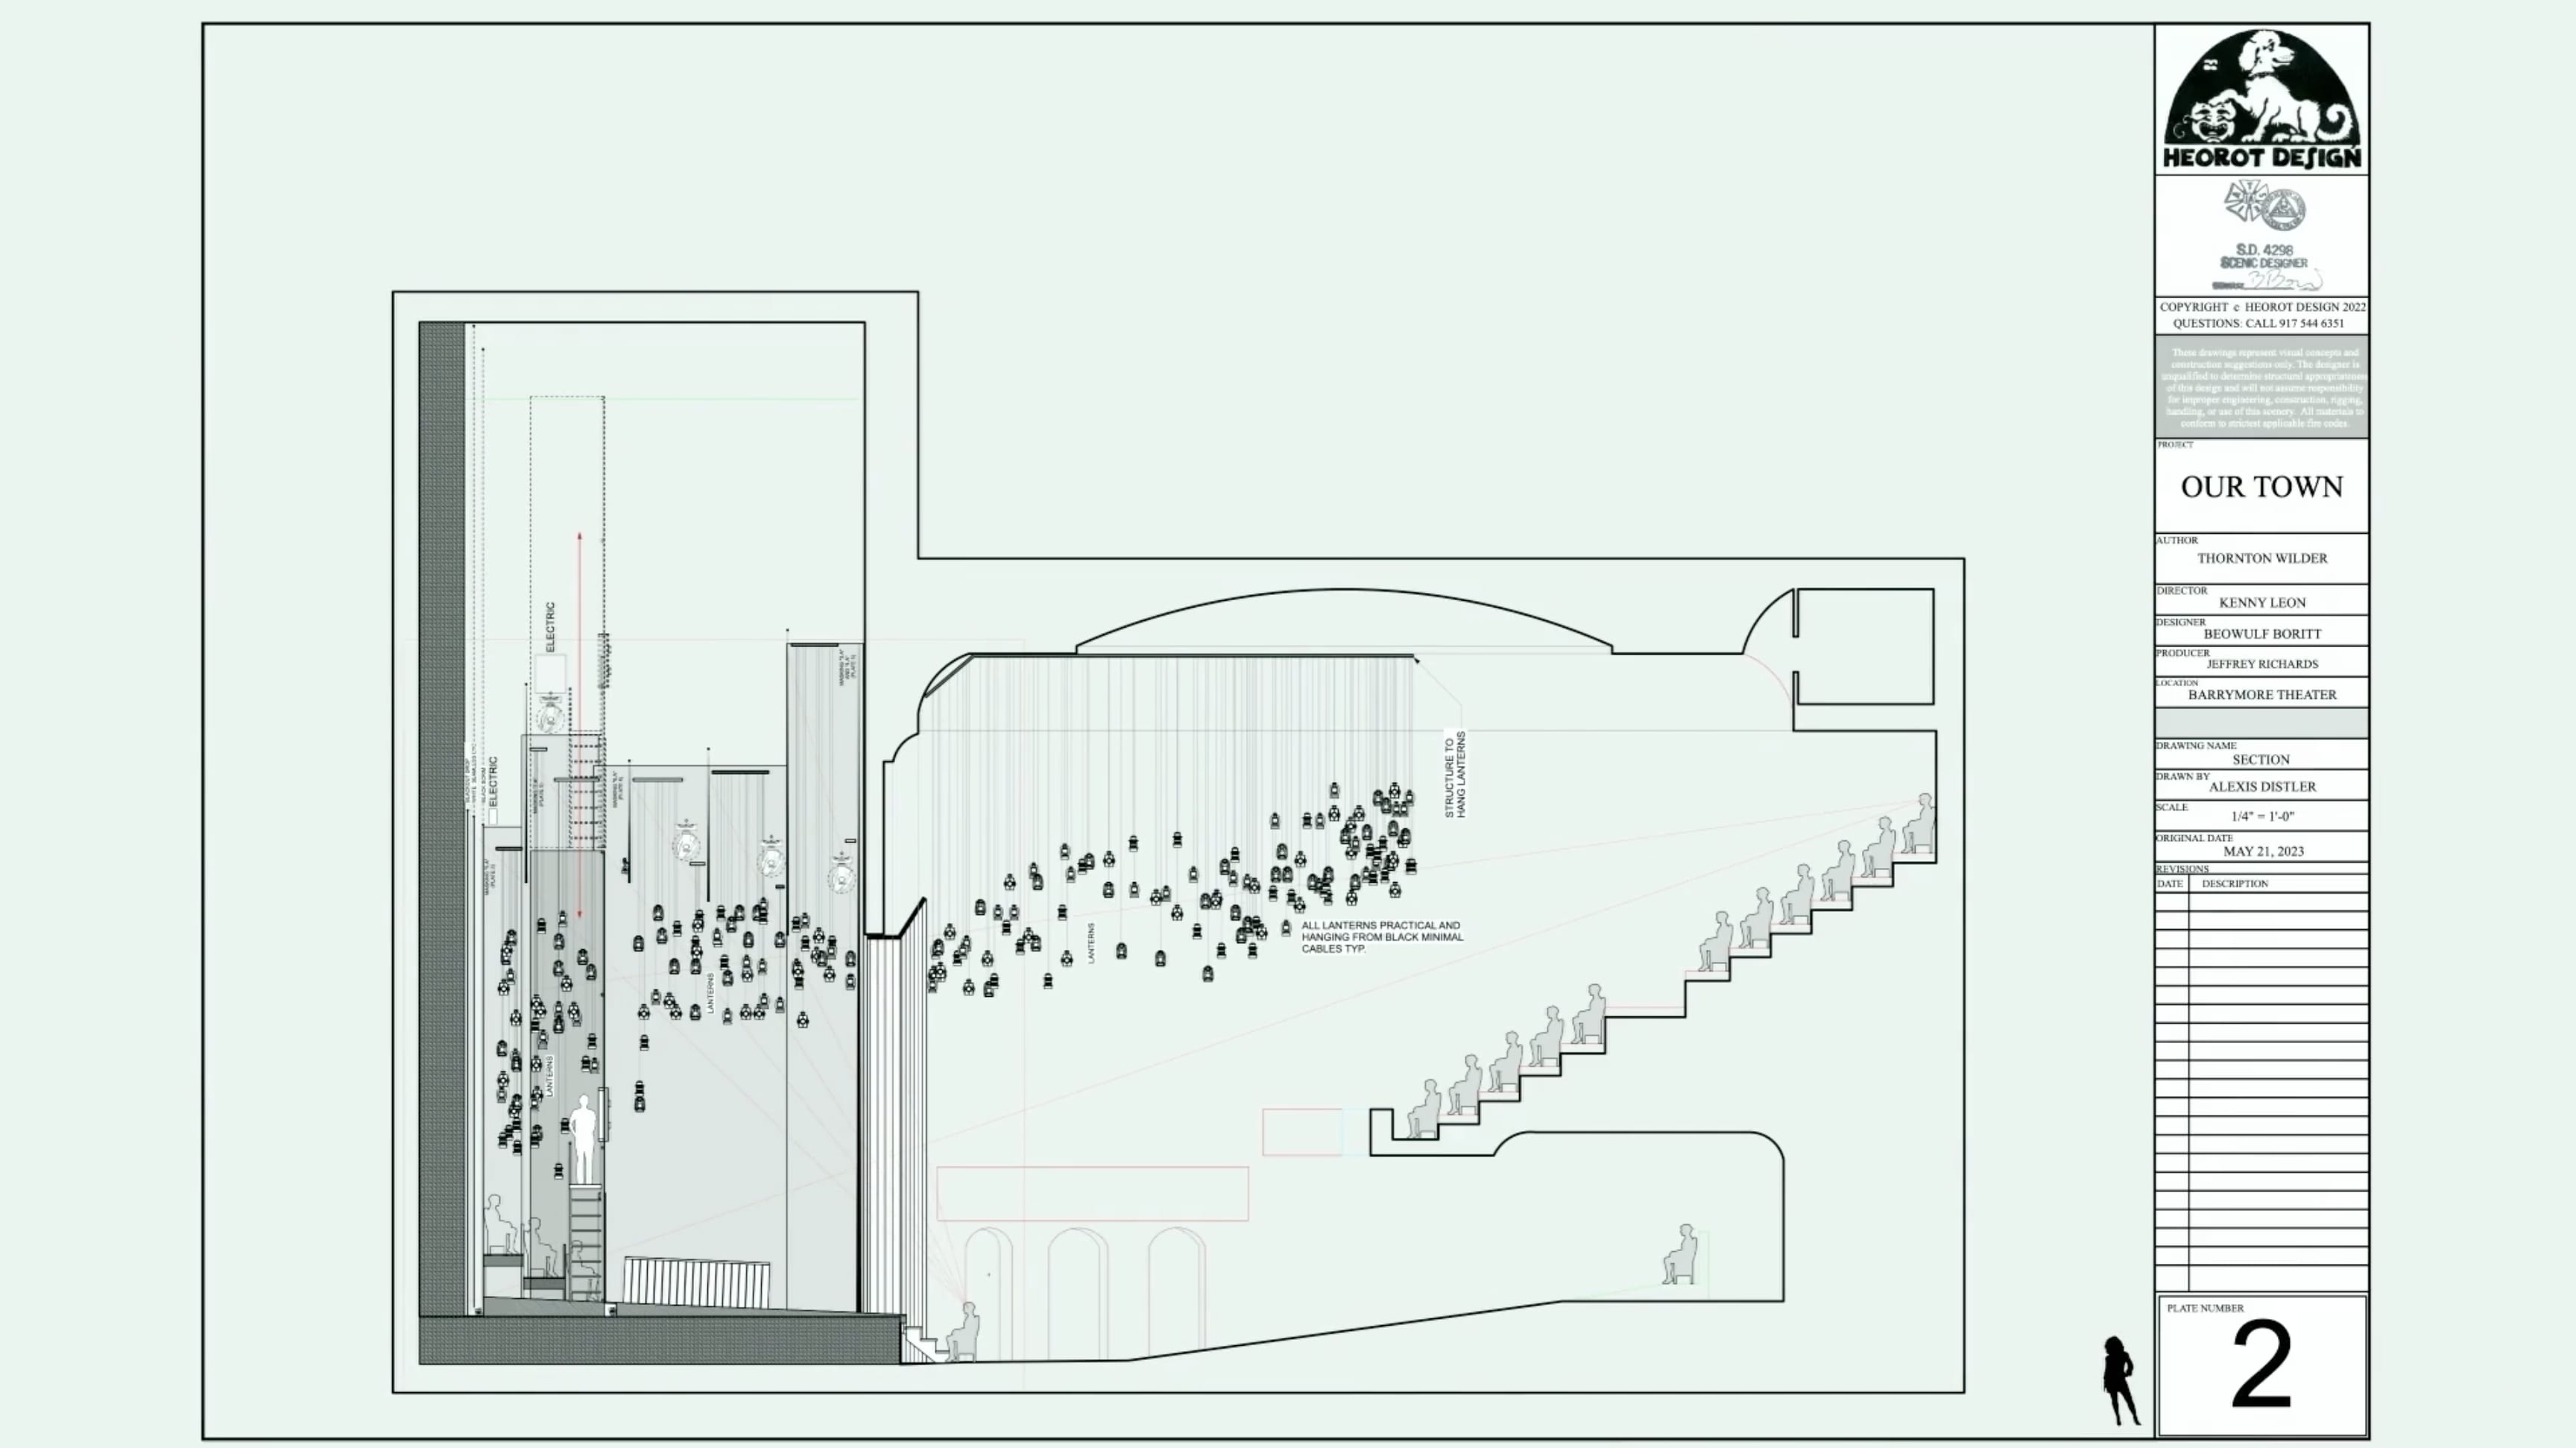
Image courtesy of Josh Benghiat.
“The first step is setting the origin — zero at the plaster line for upstage/downstage. I also adjust the vertical zero to a clean number like 100. That way, if a point measures 134 feet, I instantly know it's 34 feet above ground. It reduces mental math and speeds up workflow.”
“Another thing I do when working with sections is divide them into layers. I always start with the section on its own layer. Layers, to me, are about spatial relationships—both on paper and in the real world. In a section drawing, there's a natural hierarchy: foreground, middle ground, and background. Foreground might contain lights, the middle ground might be scenery, and the background is often the theater architecture. If we're showing booms, they sit somewhere between the scenery and the architecture. I take the time to divide the section into enough layers so these ‘virtual tracing paper sheets’ always stack correctly.”
“A trick I use with sections is Multiview. You may have stumbled into it by pressing the M key, the default shortcut. Originally intended to show top, side, and front views simultaneously, Multiview can display any views you want in separate panes. I usually close the bottom two panes and work with two: on the right, I keep the section view (rotated 90 degrees); on the left, I use the plan view.”
“Next, I look at the electrics. Set designers often include them in the section as placeholders, but they’re really just suggestions. We may need to shift their position — upstage, downstage, higher, or lower. Once everything is in the right spot, we send it back to the scenic team. Fortunately, even though the set was complex, Beowulf was very accommodating and adjusted elements where possible to help us out.”

Image courtesy of Josh Benghiat.
“For this project, I also created an elevation early in the process — something I don’t always do. But because we were shooting under the lanterns and had audience seating on both sides, it made sense. I aligned the elevation view directly above the section for easy referencing.”
“[Once lighting elements are aligned], I begin exploring what works and what doesn’t in the space. Then I develop a needs list based on the script, conversations with the director and other designers, and early ideas.”
“I’m thinking about where every light goes. I was trained to draw every single light, every single shot. I want to know what it's doing, where it is in plan, where it is in section — I want to look at it on paper before we get into the theater. Doing this on the computer makes that process easier. I’ll end up with an object for every light I want on the plot. And it works well — we can do a lot in 2D. I can check the face angle, the coverage, and get a sense of the cuts.”
“In this project, the stage was congested, but a center backlight spot gave good coverage. For the show portal, normally I’d start from the balcony rail and angle down, but with all the front-of-house lanterns, that didn’t work. After trying multiple placements, I found some useful side positions and a couple of first electric fixtures to glow the bottom of the portal. That gave us complete portal coverage while avoiding the actors.”
“My process continues with assigning a rough plot. I use the command Move BeamViz Objects to Layer, which lets me group objects by system — like ‘Front Light.’ I disable the show beam option in BeamViz, which I call ‘rough plot mode.’ It leaves a directional arrow and the channel number without displaying the full beam. This builds up a kind of stack — like red pencil marks on paper plots from when I worked as an assistant.
“At the end, I used data visualization to check the pattern — using object attributes to color-code lanterns by channel. It let me instantly see if the randomness looked natural, and I could swap values if patterns emerged.”
“Late in the process, we prepared for auditioning — quick renderings to see what each light does.”
“Ultimately, when we got into the theater, there were no surprises. We moved two lights due to speaker placement, added one during focus, and repurposed another in tech. Otherwise, all our studio prep and tools ensured a smooth show.”
Benghiat, like so many other professionals, trusts Vectorworks Spotlight for his entertainment design needs. To start using the all-in-one solution, click the button below for a free trial.
The Best Tool for Creating Light Plots of Your Own
Start your free trial of Vectorworks Spotlight.
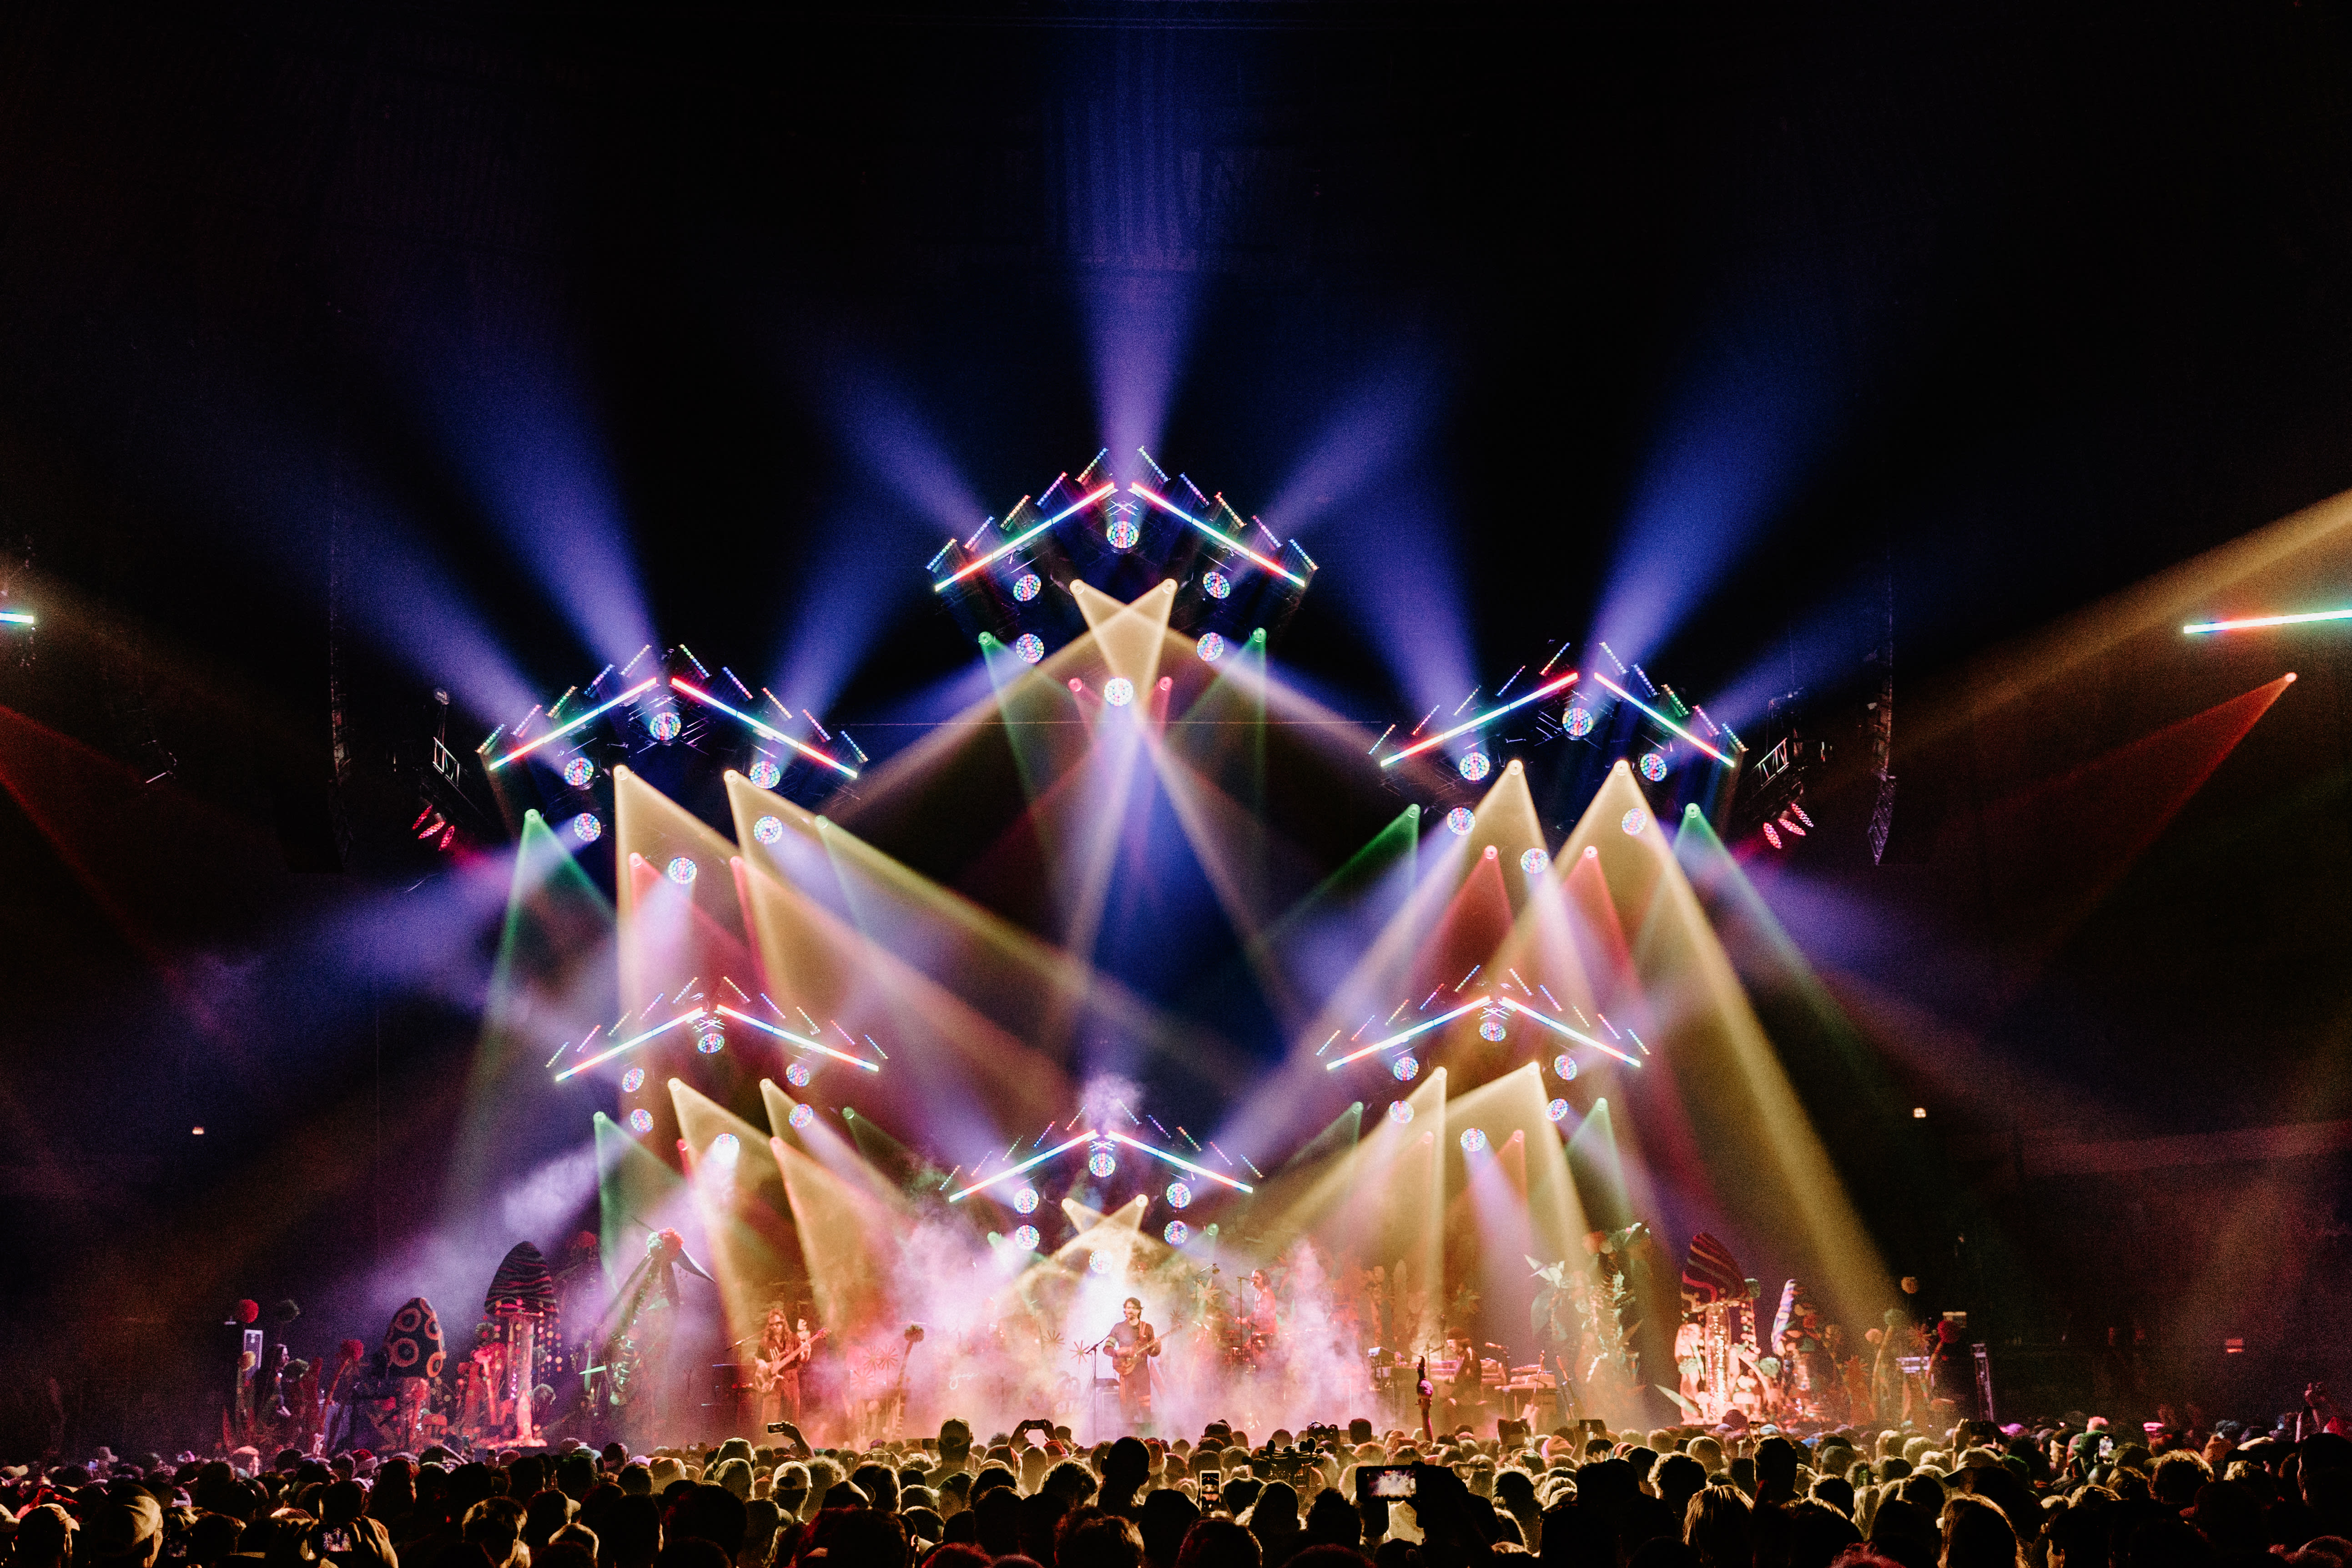
Featured image courtesy of Goedde Productions LLC and Abby Matthews.
Stay in the know with the latest insights
Subscribers receive news, customer stories, success and learning tips, event information, and other important announcements from Vectorworks.
By submitting this form, you agree that Vectorworks, Inc. and its authorized partners may contact you in regards to news, offers, and the use of our software, services, and platforms. Learn more about our privacy practices and your data on our privacy page.*